If you’d just like to dive into the code for the simple WordPress app discussed in this post you can skip ahead to Putting It All Together.
Introduction
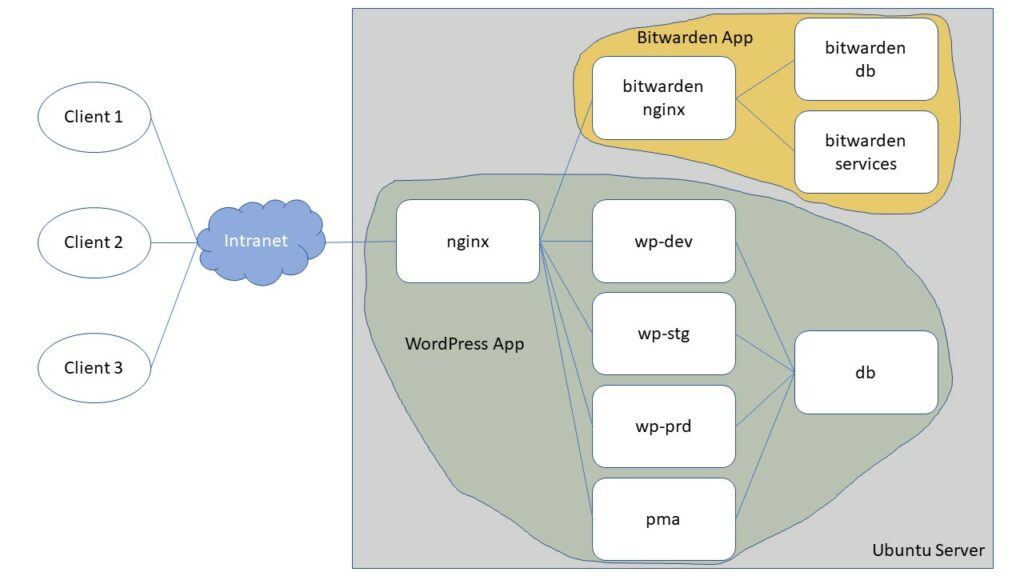
My wife started a WordPress blog recently and with an extra computer on my hands I decided to create a local version of her website to use for testing and development. Well one thing led to another and I ended up with three local WordPress websites using a single database server combined with a database management tool and password manager all running behind a reverse proxy server. It was overkill for sure but I learned a lot and had fun doing it. Here’s a simplified diagram of my project.
In sitting down to document what I’d done I thought why not start a blog of my own. But where’s the fun in just discussing my final setup and code. A tutorial, creating in the end something similar to what I’d done, but going through many of the intermediate steps I’d taken, would be more instructive for many people. I’ll focus at the beginning on just the basics, the barebone code needed to get things running. This should help with understanding the concepts, code and processes. Over time I’ll add more complexity and deal with security, performance and other enhancements.
This post starts that tutorial series, starting with just a simple local WordPress app. I’ll add to it, post by post, to create a much more complex local WordPress development environment similar to the one in the diagram above. Along the way I hope to give credit to and distill what I’ve learned from the dozens of websites that helped me along in my project.
I’ll break this project down into a series of posts starting from just the basics to get a simple WordPress site up and running to securing the site, setting up multiple WordPress sites, and incorporating a password manager to help manage the strong passwords you’ll likely want to use on your live site.
The tutorial series is structured as follows:
- Part 1 – Series introduction and creating a simple WordPress app
- Part 2 – Adding a database management tool
- Part 3 – Adding a web server
- Part 4a – Exploring anonymous volumes
- Part 4b – Exploring bind mounts
- Part 4c – Exploring named volumes
- Part 4d – Working with data storage
- Part 5 – Securing passwords with Docker secrets
- Part 6 – Securing network communications with self-signed certificates
- Part 7a – Creating your own certificate authority
- Part 7b – Securing network communications with your own certificate authority
- Part 8 – Hosting multiple WordPress sites on a single database server
- Part 9a – Installing and configuring a Bitwarden password manager
- Part 9b – Hosting Bitwarden behind a reverse proxy server
I also plan future articles to this tutorial series covering security and performance enhancements to the WordPress app and version control and other ideas for maintenance of the development environment.
Goals and Prerequisites
The end goal for this series is to have a local development environment that can match the characteristics of a public website to the extent possible to better reflect any problems that might occur with new content prior to going live. Some specific features I want to include are:
- accessing the local site with https protocol
- accessing the local site with a specific domain name
- using the same software versions locally as used to host the public site
- ease of maintenance and updates
I used an old PC for this project with Ubuntu server, Docker and Docker-Compose installed. I won’t cover their installation here, but you can find instructions at the links provided. This series assumes you have some basic knowledge of using a Linux terminal, or some other method of creating directories, files and executing commands. It also assumes you have non-root user access with sudo privileges.
I access the local WordPress sites through a browser on a PC connected to my local network to which my Ubuntu server is also connected. Many of the services discussed in the earlier tutorials can also be accessed easily on the Ubuntu server itself. As we move along though more effort will be required to do so. There are other ways to access the services built in these tutorials and you can modify the code to suit any method you choose to use.
A Simple WordPress Installation
It’s fairly easy to set up a local WordPress site for testing and development and many tutorials detail various methods. One by Themeisle I found particularly easy to follow. I used this setup for a while, but I wanted to move the development environment off my PC. Also, it didn’t meet some of the requirements for this project and updating the underlying applications seemed too
There are plenty of articles on the web detailing how to set up a WordPress site with Compose. For example, a Quickstart by Docker will get you up and running in no time, while a detailed tutorial by DigitalOcean provides a line-by-line explanation of the code helping you to come up to speed fast on the ins and outs of creating a Compose application. However, no one article pulled it all together for me and this series will hopefully help someone struggling with the same issues I did.
I found the DigitalOcean tutorial so informative that I’ve emulated it a bit here in the hope that this series provides a good understanding of the steps I’ve taken. It also helps in providing enough detail so I can reproduce what I’ve done should I be faced with this again.
A Basic Compose File Structure
Docker-Compose is a tool for defining and running multi-container Docker applications (see Compose overview for more information). At its simplest, a WordPress site can be set up with a single file with less than 20 lines of code using Compose. By default, Compose expects the name of this file to be docker-compose.yml. This file defines the services, volumes and networks used by a project. The highlighted section below lays out the basic structure of a Compose file.
Basic Compose file structure
version: '3.7'

services:
  service1:
…

  service2:
…
A Compose file is made up of keys, options and values structured in levels indicated by their indent. The version and services keys above are said to be top-level keys as represented by their outer indent. The service1 and service2 keys above are options of the top-level services key supporting it as sub-topics. The indent structure is important. Different keys, options and values of the same level must be indented similarly or Compose will complain. For more information see the Compose reference.
Our simple Compose file contains several sections as follows:
- version: specifies the Compose version used. Specifying a version is important as different Compose versions have different features. This project will use Compose version 3.7, which was the latest at the time of this writing.
- services: specifies service definitions, service1 and service2, containing the configuration applied to the Docker container for the service. Our simple WordPress app will contain two services,
a database service and the WordPress service itself.
A Basic Compose File Structure for WordPress
In this simple WordPress app, we’ll specify the minimal, or barebones configuration required to launch the WordPress installation routine. As outlined above, the app will contain a database and WordPress service. The names of the services are up to you, but must be unique within a Compose file. Let’s call our services db and wp for the database and WordPress services respectively. We’ll add a few sub-topic keys to each service to configure its Docker container. These keys specify the application image to use, the setup environment and the ports used to access the app from your browser. With this our Compose file structure becomes:
Basic Compose file structure for a simple WordPress app
version: '3.7'

services:
  db:
    image:
    environment:

  wp:
    image:
    ports:
    environment:
Our simple Compose file contains several new sections as follows:
- image: specifies the image to start the service container from. An image is essentially a complete application that will run as a service in a Docker container. Docker container images are available at Docker Hub. The Docker Hub contains a wide assortment of container images for various popular applications. Docker curates a group of “official images” of many applications, including most of those used in this series. This is just a small subset of the millions of images available for you to explore at Docker Hub. Docker
maintains a repository of container images on your system for the images you use. If the specified image isn’t available Compose will pull it fromits online repository. - environment: specifies any environment variables required or desired to setup and initialize a service. Not all services provide for environment variables. Some services provide for configuration and/or initialization files. Some provide for all three. In our simple WordPress
app , we’ll use the minimum required environment variables to set up WordPress. - ports: specifies the ports utilized by the application. In our simple WordPress
app , you’ll use this information to access the app through your browser.
With the basic Compose file structure behind us, let’s move on to specify our two services further. Let’s start with the database service.
A simple database service
  db:
    image: mariadb
    environment:
      MYSQL_ROOT_PASSWORD: simplewordpress
      MYSQL_DATABASE: wordpress
For our simple WordPress app, we only need to specify a database image, a root user password, and database name for our database service. I’ve added these to the Compose file above as follows:
- image: we’ll be using MariaDB as our database service. I used this because it is the database service used by my hosting company. WordPress works with the MySQL database which MariaDB is a community-developed fork. Compose allows you to tag a specific version of an image to use, but we’ll deal with that in a later post. For now, we’ll simply specify using the MariaDB image and Compose will use the latest image available (or more technically which ever image is tagged as “latest” in the repository).
- environment: MariaDB requires only a root password and we specify it here. This of course is not a secure way to specify a password. The password is in plain view here and is readily available when inspecting the Docker container of the database service. In Part 5 – Securing Passwords With Docker Secrets, I’ll discuss a way to hide this variable from view. To get our app to work we also have to specify a WordPress database name which MariaDB will create on start up. The WordPress documentation implies that WordPress will create this database if it doesn’t already exist, but without specifying this variable I get a “Error establishing a database connection” message when trying to connect to the WordPress app on startup. I have an idea this is because initialization of the database service is completed beyond the point where the WordPress initialization routine attempts to establish a database connection. Compose has a key called depends_on which controls service start up order but using it doesn’t resolve this issue. I’ll talk more about the depends_on key in Part 8 – Hosting Multiple WordPress Sites. There are some workarounds that could delay the start of the WordPress service and possibly resolve this issue, but they are beyond the scope of these tutorials. Other environment variables are also available for the MariaDB service which we’ll cover in future posts.
Let’s move on to specify the WordPress service.
A simple WordPress service
  wp:
    image: wordpress
    ports:
      - "8000:80"
    environment:
      WORDPRESS_DB_HOST: db
      WORDPRESS_DB_NAME: wordpress
      WORDPRESS_DB_USER: root
      WORDPRESS_DB_PASSWORD: simplewordpress
In our simple WordPress app, the WordPress service requires us to specify a WordPress image to use and the ports to use to access the WordPress service. We must also specify environment variables for the database host, the name of the database that will be used by the WordPress service, and a user name and password to access the database. I’ve added these to the Compose file as follows:
- image: for now, we’ll simply specify wordpress as the image to use and Compose will use the image from the repository tagged “latest”. In future posts we’ll want to use a more specific version.
- ports: ports are commonly specified as host:container pairs. Our simple WordPress app will be available over the host’s port 8000. The container will receive the connection on port 80 which the WordPress service makes available by default. I’ll discuss more about ports in future posts.
- environment: here I’ve specified a database host and name and a user name and password. For simplicity I’ve simply used the root user and password from the database service. You can specify a different user and password and we’ll be doing that in a future post.
So, there we are. In less than 20 lines of code we have a complete app to run a local WordPress site.
Putting It All Together
Our complete Compose file is listed below. I’ve created mine in a directory named part-1. I’ll be using a similar structure as we move the the series. You might want to do so as well.
docker-compose.yml file for a simple WordPress app
version: '3.7'

services:
  db:
    image: mariadb
    environment:
      MYSQL_ROOT_PASSWORD: simplewordpress
      MYSQL_DATABASE: wordpress

  wp:
    image: wordpress
    ports:
      - "8000:80"
    environment:
      WORDPRESS_DB_HOST: db
      WORDPRESS_DB_NAME: wordpress
      WORDPRESS_DB_USER: root
      WORDPRESS_DB_PASSWORD: simplewordpress
We can start our app with the docker-compose up command from the directory with your docker-compose.yml file, part-1, in my case.
docker-compose up -dThe -d option starts up the project in detached mode which means that after startup your project will run in the background. With this command Compose will do a number of things, including:
- create a default network connecting the database and WordPress services
- Pull the MariaDB and WordPress images from their official repositories if not already on your system
- create a container for the database and WordPress services and run them in the background. Omit the -d option to run them in attached mode which displays all of the logs from all of the containers. This is especially useful in troubleshooting startup issues.
And that’s it. Your WordPress app is up and running. You can confirm this with the docker ps command.
docker pswhich will show
CONTAINER ID     IMAGE         COMMAND                  CREATED           STATUS          PORTS                    NAMES
da72cb226e19     wordpress     "docker-entrypoint.s…"   7 minutes ago     Up 7 minutes    0.0.0.0:8000->80/tcp     part-1_wp_1
ea45a7909717     mariadb       "docker-entrypoint.s…"   7 minutes ago     Up 7 minutes    3306/tcp                 part-1_db_1
This shows that your MariaDB and WordPress services are up and running. I’ll explain more about this display in Part 2.
You can access your app by entering one of the following in your browser:
- from the computer hosting the app, if it has a browser
http://localhost:8000- from a computer on your local network
http://<host-ip>:8000or
http://<host-name>:8000You can find out your Ubuntu server’s IP address and host name with
hostname -Ifor the IP address or
hostname -Afor the host name. Depending on your system setup you may have more luck initially connecting using your server’s IP address than its hostname. I’ve found that after the initial connection with the IP address I can usually connect without problem with the host name.
Don’t panic is you get an “Error establishing a database connection” message when first trying to access your site. The MariaDB must initialize the database prior to accepting connections. This can take some time. Perhaps due to a bug in MariaDB at the time of writing, the initialization process takes over 8 minutes. You can monitor the initialization by viewing the database container’s logs, which I’ll discuss in another post. Access your app once the database initializes and you should see the WordPress installation page as shown below.
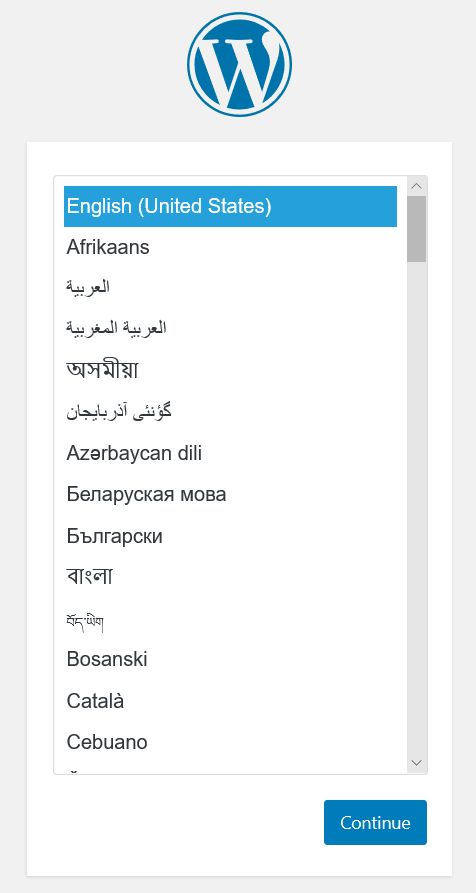
That’s it. You can now finish the WordPress installation by following the prompts.
You now have a simple WordPress app for testing out different themes, plugins or other features. You might want to read First Steps with WordPress for an overview of using WordPress. There are also numerous websites providing WordPress guidance from the most basic to the most advanced. For now, have fun with your simple WordPress app.
Note that you’re not limited to a single WordPress site. It’s easy to start another by copying your Compose file to a new directory, changing the access port and using the commands above to start a new local WordPress site.
Wrapping Up
When you’ve finished with your WordPress app you can shut it down using the docker-compose down command as follows.
docker-compose downor
docker-compose down -vThe first command will simply shutdown your app while maintaining the WordPress files and database that Docker has created for you in its own storage area. These can be restored if you later restart the app, but note the emphasis on the word can. If you restart your app with the docker-compose up command, Compose will not automatically restore your WordPress files and database but will start up a new WordPress installation as above. We’ll discuss the issue in Part 4a – Where’s My Data.
Use the docker-compose down -v command to completely remove the app from your system, including any data that Docker has stored for the app. Its best to use this command if you will not be using your WordPress site again. Otherwise you’ll have to manually clean up the items that Docker has maintained for you later. Just note that the -v option instructs Compose to remove any data volumes it has created for you. This means that you will lose all of your data and unless you’ve made a backup it can’t be undone.
Well that’s it. Sixteen lines of code for a simple WordPress app. But we can do a lot more. Next up in Part 2 – Adding a Database Management Tool, we’ll expand our simple WordPress app by adding a database management tool that will allow us to work with the WordPress database directly.