If you’d just like to dive into the code for adding named volumes to our WordPress app from the Part 3, you can skip ahead to Putting It All Together.
Introduction
This is Part 4d in a series describing a project to create a local WordPress development environment using Docker-Compose. The series is structured as follows:
- Part 1 – Series introduction and creating a simple WordPress app
- Part 2 – Adding a database management tool
- Part 3 – Adding a web server
- Part 4a – Exploring anonymous volumes
- Part 4b – Exploring bind mounts
- Part 4c – Exploring named volumes
- Part 4d – Working with data storage
- Part 5 – Securing passwords with Docker secrets
- Part 6 – Securing network communications with self-signed certificates
- Part 7a – Creating your own certificate authority
- Part 7b – Securing network communications with your own certificate authority
- Part 8 – Hosting multiple WordPress sites on a single database server
- Part 9a – Installing and configuring a Bitwarden password manager
- Part 9b – Hosting Bitwarden behind a reverse proxy server
In Parts 4a-c we’ve explored how Docker stores data in anonymous volumes, bind mounts and named volumes, the latter two allowing us to persist data from session to session. In this tutorial, we’ll continue discussing data storage within Docker, focusing on ways you might want to configure and utilize persistent storage for a WordPress project. We’ll also look at using the Docker exec and run commands to back up our WordPress database and files.
If you need an overview of Docker data storage options before you move on you can read Docker’s storage overview. For the remainder of this post we will continue working with our project files from Part 4c. If you’ve completed the exercises from that part of the tutorial, make sure you’ve shutdown your project before continuing.
Adding Data Storage to Our WordPress App
We’ve examined the basics of data storage in Docker, but now let’s put it into practice within our WordPress app by doing some practical things such as providing access to specific WordPress content such as the themes or plugins directories or backing up our WordPress database and files.
Let’s add some data storage to our project that we’ll use for the next several sections of this post. Continuing with the multi-file startup process we learned in Part 4c, let’s add data storage with a separate file called docker-compose-prod.yml. You might use this approach to specify a different configuration for your development and production environments. I will continue working with my part-4 directory. Let’s configure several named volumes and bind mounts as shown below.
/part-4/docker-compose-prod.yml
version: '3.7'

services:
  db:
    volumes:
      - db:/var/lib/mysql
      - ./backup:/home/backup

  wp:
    volumes:
      - wp:/var/www/html
      - ./themes:/var/www/html/wp-content/themes
      - ./plugins:/var/www/html/wp-content/plugins
      - ./backup:/home/backup

volumes:
  db:
  wp:
You can see that we’ve provided a named volume for persistent storage for our MariaDB and WordPress services. We’ve also configured several bind mount directories for backup and access to WordPress themes and plugins content.
Now start your app with the following command from the part-4 directory.
docker-compose -f docker-compose.yml -f docker-compose-prod.yml up -dGo ahead and complete the WordPress installation as we’ll be working with it in the next few sections.
You can verify that Compose has created named volumes for our MariaDB and WordPress services by using the docker volume ls command. As we saw in Part 4c, Compose will use these volumes to persist our database and WordPress files between sessions.
Examining your part-4 directory you’ll notice that Compose has created the backup, themes and plugins directories. The backup directory should be empty. We’ll use it later to store backups of our database and WordPress files. The themes and plugins directories should contain the installed themes and plugins for our WordPress installation. You can use these directories to modify existing themes and plugins or add new ones. Here are the themes and plugins that came with my WordPress installation.
/part-4/themes
total 16
-rw-r--r-- 1 www-data www-data   28 Jun  5  2014 index.php
drwxr-xr-x 8 www-data www-data 4096 Mar 31 13:03 twentynineteen
drwxr-xr-x 5 www-data www-data 4096 Mar 31 13:03 twentyseventeen
drwxr-xr-x 7 www-data www-data 4096 Mar 31 13:03 twentytwenty
/part-4/plugins
total 12
drwxr-xr-x 4 www-data www-data 4096 Mar 31 13:03 akismet
-rw-r--r-- 1 www-data www-data 2578 Mar 18  2019 hello.php
-rw-r--r-- 1 www-data www-data   28 Jun  5  2014 index.php
As an illustration of how you might utilize the themes and plugins directories, let’s create a child of the twentyseventeen theme and a simple plugin to display a message on the login screen.
Utilizing Our Themes Directory to Create a Child Theme
WordPress themes let you easily change the appearance of your WordPress site. While there are numerous themes to choose from you may find that a particular theme meets most but not all of your design goals. While you could modify the theme to suit your needs, a better choice would be to create a child theme based on the theme you like. That way when you update the parent theme you won’t lose the changes you made.
As an example of how you might use our /part-4/themes directory, let’s use it to create a child theme for our WordPress site. My objective here isn’t to instruct you on how to create child themes, but rather to illustrate how you might utilize our bind mounted themes directory to create one. WordPress has a basic overview on creating child themes that I’ll follow here. You can find a lot more information on the web if you are interested in creating your own themes.
Let’s create a child of the Twenty-seventeen theme. For illustrative purposes let’s create the child theme so that it has a light-blue background. Of course, creating a child theme for just this simple modification is overkill, but it demonstrates working with our bind mounted themes directory.
First create a directory for your child theme under the themes directory, I’ve called mine twentyseventeen-child. Note that you will likely need to use a root shell or sudo privileges to perform all operations in the themes directory as it is owned by our WordPress app. Next create a style.css file in the child directory with the following content.
/part-4/themes/twentyseventeen-child/style.css
/*
Theme Name: Twenty Seventeen Child
Template:   twentyseventeen
Version:    1.0.0
*/

.site-content-contain {
    background-color: lightblue;
}
The Theme Name and Template lines are the only required content in style.css to create a child theme. I’ve also specified a version number and provided some code to make the background of our child theme light-blue.
Following the WordPress Child Theme overview, we now need to enqueue our parent and child stylesheets. To do so create a file called functions.php with the following code.
/part-4/themes/twentyseventeen-child/functions.php
<?php
add_action( 'wp_enqueue_scripts', 'my_theme_enqueue_styles' );
function my_theme_enqueue_styles() {
    $parent_style = 'parent-style';
    wp_enqueue_style( $parent_style, get_template_directory_uri() . '/style.css' );
    wp_enqueue_style( 'child-style',
        get_stylesheet_directory_uri() . '/style.css',
        array( $parent_style ),
        wp_get_theme()->get('Version')
    );
}
You can now preview or activate your new child theme from the WordPress dashboard menu by selecting Appearance > Themes. You will note that a new theme, Twenty Seventeen Child has been added which you can choose as your new theme. If you compare the theme with its parent, you’ll note that the child has content with a light-blue background while the parent theme’s background is white.
This was just a very basic example showing how to use our /part-4/themes directory for theme development. There is a lot more to explore. Be patient as you work through any content as you might have to make modifications to get things working the way you want. The functions.php file above is a good example. In some situations, the child theme needs to enqueue both the parent and child style sheets and in others, only the child style sheet. Not all examples note this and given that things change over time, some may seem inconsistent. Just have some fun and use the WordPress app you’ve created to experiment further.
Let’s continue working with our bind mounted volumes with another simple example, creating a plugin.
Utilizing Our Plugins Directory to Create a Custom WordPress Plugin
WordPress plugins provide a convenient way to customize the functionality of your WordPress site without altering the core WordPress code. As with creating a child theme above, my objective here is to just provide a practical example of using our plugins directory and not to instruct you on creating WordPress plugins. For that you might want to refer to WordPress’ Writing a Plugin or Introduction to Plugin Development.
As an example of how you might use our /part-4/plugins directory, let’s use it to create a custom plugin for our WordPress site. At its most basic, a plugin is simply a php file in the WordPress plugins directory that includes the required Plugin Name line of code. The WordPress core code provides the functionality to display and activate the plugin.
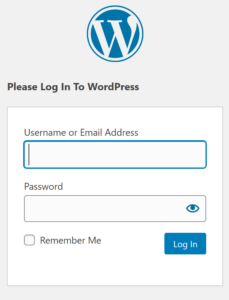
Let’s create a plugin to display a custom greeting at the top of our WordPress login form. To do so we’ll take advantage of the WordPress login_message hook. WordPress hooks provide ways to link into the core WordPress code to alter its functionality.
First create a directory for your custom plugin under the plugins directory, I’ve called mine login-msg. While we could simply place our plugin file directly in the plugins directory, common practice is to put it in its own directory. Note that you will likely need to use a root shell or sudo privileges to perform all operations in the plugins directory as it is owned by our WordPress app. Next create the following file called login-msg.php in the login-msg directory.
/part-4/plugins/login-msg/login-msg.php
<?php
/*
Plugin Name: Login Message
*/

function my_login_msg() {
  return '<h3>Please Log In To WordPress</h3>';
}
add_filter( 'login_message', 'my_login_msg' );
The Plugin Name line of code identifies the file as a plugin. It is the only required line in the comment header of a plugin file. I’ve then defined a function that simply returns the text “Please Log In To WordPress” formatted as an H3 header. You can change this text or its formatting to whatever you like. Finally, the last line of code is key. Here the add_filter function adds the my_login_msg function to the login_message hook. When the login_message filter is applied, our my_login_msg function will be called which returns “Please Log In To WordPress” which is then set as the login message.
You can now activate your new plugin from the WordPress dashboard by selecting Plugins > Installed Plugins from the menu. Under the Login Message plugin, you should see two options, Activate and Delete. Select Activate to activate the plugin. Now log out of your WordPress site and you should be redirected to the WordPress login page where you should see the new login message “Please Log In To WordPress”.
This was just a very basic example showing how to use our plugins directory for plugin development. Let’s finish with a final example of working with our bind mounted directories, backing up our WordPress database and files to our /part-4/backup directory.
Backing Up and Restoring the WordPress Database and Files with the Docker Exec Command
In Part 2, we saw how to export our WordPress database to a backup file using our Adminer database service. I find this a handy way of backing up the database. However, there are other ways to do this as well and each may be more or less suitable to a particular situation. While the WordPress database contains a large portion of your site’s content, some content and any modifications you’ve made to WordPress functionality are located in files within the WordPress directories. In maintaining your site, you’ll likely want to backup this content as well.
The docker exec command, which we’ve used previously in Part 4 to examine our container’s data storage, can also be used to run commands within our containers to backup and restore our WordPress data. As another illustration of using a bind mounted directory, let’s backup and restore our WordPress database and files, working from within our MariaDB and WordPress containers with the docker exec command.
First use the docker exec command to run a shell within our MariaDB container.
sudo docker exec -it part-4_db_1 /bin/bashNow use the mysqldump client within our MariaDB container to create a backup file of our WordPress database. You’ll be prompted for the database password. Recall that since we are working within the container, the /home/backup directory in the command below refers to a directory internal to the MariaDB container to which our own /part-4/backup directory is mounted.
mysqldump -uroot -p wordpress > /home/backup/wordpress.sqlYou can verify that wordpress.sql is now in the container’s /home/backup directory. You can also verify that the file is in our own /part-4/backup directory.
Similarly, we can import a database from within the MariaDB container with the mysql shell as follows.
mysql -uroot -p wordpress < /home/backup/wordpress.sqlThis assumes of course that the database we want to restore, wordpress.sql here, is already in our /part-4/backup directory and thus available to our MariaDB container in its internal /home/backup directory.
Now let’s turn to our WordPress container. Exit out of the MariaDB container with the exit command and use the docker exec command below to run a shell within our WordPress container.
sudo docker exec -it part-4_wp_1 /bin/bashAs we saw in Part 4a this puts us in the working directory, /var/www/html, within our WordPress container. There are various strategies for backing up your WordPress files, from backing up the entire /var/www/html directory to just focusing on your content within the /var/www/html/wp-content directory. Let’s use the tar command to create a backup of the entire WordPress directory (note we’ll run the following commands from within the /var/www/html directory; it needs to be modified if you run it from some other directory).
tar -cf /home/backup/backup.tar .Here the -cf options instruct the tar command to create a new archive file, /home/backup/backup.tar. Use options -cvf if you’d like to see a list of the files included in the archive. You can verify that backup.tar is now in the container’s /home/backup directory. You can also verify that the file is in our own /part-4/backup directory.
Similarly, we can restore a WordPress archive from within the WordPress container. First, to test that our restoration worked, delete all of your WordPress files with the following command (be careful! make sure you run this command from within the container’s /var/www/html directory to only delete the WordPress files).
rm -R *You should receive warnings that our themes and plugins directories can’t be removed. This is because they are still mounted within the container. If you are curious, you might want to try to access your WordPress app after you’ve deleted the WordPress files. You’ll find that you are no longer able to access it. This makes sense since the WordPress files governing the creation of your website no longer exist.
Now restore the WordPress files from the backup.tar file we created above with the following command (again from within the container’s /var/www/html directory).
tar -xf /home/backup/backup.tarThe -xf options instruct the tar command to extract the backup from the archive file /home/backup/backup.tar. Use options -xvf if you’d like to see a list of the files extracted from the archive. That’s it. You can verify that you can once again access your WordPress site.
We’ve seen we can easily backup and restore our WordPress database and files from within our containers using the docker exec command taking advantage of our bind mounted backup directory. In the next section we’ll take it a step further, showing we can perform the same operations without the interactive shell and without a permanently mounted backup directory.
When you’ve finished with this section, shutdown you WordPress app with the following command.
docker-compose -f docker-compose.yml -f docker-compose-prod.yml down -vPutting it All Together
So far in Part 4 we’ve worked with various bind mounts and named volumes specified in files separate from our main Compose file. In preparation for moving forward in the tutorial series, let’s consolidate our data storage configuration within our docker-compose.yml Compose file. I’m going to specify a single named volume for each of our MariaDB and WordPress services, db and wp respectively. These will be all that we need going forward. You can include other data storage if you would like to experiment further or have specific development objectives. With that our Compose file should now look like the following.
/part-4/docker-compose.yml
version: '3.7'

services:
  db:
    image: mariadb
    environment:
      MYSQL_ROOT_PASSWORD: simplewordpress
      MYSQL_DATABASE: wordpress
    volumes:
      - db:/var/lib/mysql

  wp:
    image: wordpress
    environment:
      WORDPRESS_DB_HOST: db
      WORDPRESS_DB_NAME: wordpress
      WORDPRESS_DB_USER: root
      WORDPRESS_DB_PASSWORD: simplewordpress
    volumes:
      - wp:/var/www/html

  adminer:
    image: adminer

  nginx:
    image: nginx
    ports:
      - "80:80"
    volumes:
      - ./nginx:/etc/nginx/conf.d

volumes:
  db:
  wp:
Since we’ve consolidated our data storage within our Compose file, make sure you move, rename, or delete your docker-compose.override.yml file if you created one in Part 4b. Otherwise, the bind mounts configured in the override file will be used for storage rather than our named volumes above.
We haven’t made any changes to our nginx configuration file. You should have one as follows.
/part-4/nginx/nginx.conf
server {
  proxy_set_header Host $host;

  location / {
    proxy_pass http://wp;
  }

  location /adminer {
    proxy_pass http://adminer:8080;
  }
}
Finally, if you haven’t been following through the tutorial above, you’ll need to create the backup directory /part-4/backup if you’re going to work through the remaining exercises of this tutorial. We won’t be mounting it within our containers as we did above. I’ll be showing you other ways to utilize it with them.
Now start your project up with the docker-compose up -d command. We’re going to revisit backing up and restoring our WordPress data so go ahead and access and initialize your WordPress site.
Above, we used the docker exec command to run a shell within our MariaDB and WordPress containers and then ran commands to backup and restore our WordPress database and files. To accomplish that we mounted a backup directory within the containers to facilitate access with our host file system. We can simplify the process however, doing away with the mounted directory and performing each backup and restore operation with a single command. Let’s see how.
You can use the following command to back up your WordPress database. You will be prompted for your database password.
sudo docker exec -i part-4_db_1 mysqldump -uroot -p wordpress > ./backup/wordpress.sqlThis uses the docker exec command to directly run the mysqldump backup client within the MariaDB container. Note that the interactive option -i is required to allow you to input your password at the prompt. If you don’t mind including your database password you can avoid the -i option with the following (assuming you’ve used “simplewordpress” as your database password; if not change it as appropriate).
sudo docker exec part-4_db_1 mysqldump -uroot -p"simplewordpress" wordpress > ./backup/wordpress.sqlNote that we are referencing the /part-4/backup directory on our host file system compared to above where we referenced the /backup directory within the MariaDB container. As such we don’t need to bind mount this directory to the container as we did above.
You can restore your WordPress database as follows.
sudo docker exec -i part-4_db_1 mysql -uroot -p"simplewordpress" wordpress < ./backup/wordpress.sqlThe -i option is needed here to allow the redirection of input from the wordpress.sql file. Note that by default these commands handle dropping an existing table before restoring it. However, if your database structure has changed since you backed it up, you’ll likely want to drop its tables before restoration with the command above.
There have been reports of problems when reading the backup file from the host, for example here. I haven’t had this problem but if you do you can first copy your backup file to your container with the docker cp command as follows.
docker cp ./backup/wordpress.sql part-4_db_1:home/wordpress.sqlYou can then restore your WordPress database with the following command.
sudo docker exec part-4_db_1 bash -c 'mysql -uroot -p"simplewordpress" wordpress < /home/wordpress.sql'Here we need to run the mysql shell within a shell itself as the docker exec command just runs a single command. Or you might prefer the somewhat more straightforward use of the mysql execute option, -e, specifying the source sql file for our import.
sudo docker exec part-4_db_1 mysql -uroot -p"simplewordpress" wordpress -e "source /home/wordpress.sql"Let’s turn to backing up our WordPress files. As above I’m just going to cover backing up the entire WordPress installation. You can modify the following as appropriate if you’d like to backup only a portion of your WordPress files.
The following command creates the backup file, ./backup/backup.tar, of the WordPress files in the container’s /var/www/html directory, which is its working directory. Of course, this needs to run from our /part-4 directory.
sudo docker exec part-4_wp_1 bash -c "tar -c *" > ./backup/backup.tarGiven the size of the backup you may prefer to use tar -cz * above to create a compressed backup.
A somewhat convoluted but more flexible alternative uses the docker run command.
docker run --rm --volumes-from part-4_wp_1 -v $(pwd)/backup:/backup ubuntu bash -c "tar -cf /backup/backup.tar var/www/html"The command does the following:
- starts a new container from the Ubuntu image
- mounts the data volume from our part-4_wp_1 container
- bind mounts our /part-4/backup directory
- runs our backup command in a bash shell
- removes the new container when completed
Note that we have to specify the proper directory to backup because we haven’t specified the working directory of the new container created by the docker run command. But this does have some implications for the command we use to restore our backup as we’ll see in a bit. Alternatively, we could specify or move to the working directory per one of the following.
docker run --rm --volumes-from part-4_wp_1 -v $(pwd)/backup:/backup -w /var/www/html ubuntu bash -c "tar -cf /backup/backup.tar ."The -w option above specifies the working directory of the new container. When the new container starts the bash shell will be run from the working directory /var/www/html. Or we could use the tar command directory option, -C, to change to the /var/www/html directory as follows.
docker run --rm --volumes-from part-4_wp_1 -v $(pwd)/backup:/backup ubuntu bash -c "tar -cf /backup/backup.tar -C /var/www/html ."This has the added benefit of being able to be run from any directory. Finally, we could simply change to the /var/www/html directory prior to running the tar command as follows.
docker run --rm --volumes-from part-4_wp_1 -v $(pwd)/backup:/backup ubuntu bash -c "cd /var/www/html && tar -cf /backup/backup.tar ."This could be preferable if you plan to tack on additional commands that require you to be in the /var/www/html directory.
We also have several alternatives to restore our WordPress backup. Also, as mentioned above, we have to consider how our backup file was created when either selecting the directory to run the restoration command from or specifying the options to use when running the restoration. Easiest would be to perform the restoration in a similar manner as the backup. If you’ve forgotten how you created your backup file you can use the tar -tf ./backup/backup.tar command from the project directory, /part-4, to examine the path structure of the archived files.
For example, in the backup file created using the tar -cf /backup/backup.tar var/www/html command above, we find var/www/html/ as a leading component. With this you must either extract the backup from the root directory or if extracting in the working directory, strip off the var/www/html/ components from each file. You can do this with the –strip-components=3 option (–strip 3 also works for me). I’ll leave that to an exercise. You can run a shell inside the WordPress container to examine the results of various restorations.
Another consideration on restoring your WordPress files is removing your current WordPress installation before restoring and changing the ownership of the installation files after the restoration. One or both may or may not be needed depending on your setup. We don’t need either to restore the simple backups I’ve done above but I’ll do both of these in the commands below for completeness.
Using the docker exec command to restore our WordPress files requires us to first copy the backup file to the container, absent mounting the /part-4/backup directory at least. Thus, the following two commands can be used to restore our WordPress backup.
docker cp ./backup/backup.tar part-4_wp_1:home/backup.tar
docker exec part-4_wp_1 bash -c "rm -R * && tar -xf /home/backup.tar && chown -R www-data:www-data ."
Alternatively, and my go to option, we can use the docker run command as follows.
docker run --rm --volumes-from part-4_wp_1 -v $(pwd)/backup:/backup ubuntu bash -c "cd /var/www/html/ && rm -R * && tar -xf /backup/backup.tar && chown -R www-data:www-data ."Wrapping Up
Well that was a lot. We’ve worked with the two Docker data storage options, using bind mounts in creating themes and plugins, and backing up portions of our named volumes. There is a lot more for you to dive into if you have the inclination. We’ve also looked deeper into uses of the docker exec command, as well as having a go at the docker run command.
Next up, let’s get rid of the sensitive data from our Compose configuration file with Docker secrets in Part 5 – Securing passwords with Docker secrets.