This is the first of two posts in Part 9 discussing adding a Bitwarden password manager to the same server hosting our simple WordPress app. Unfortunately, there isn’t much to skip, but if you’d like to just get to the Bitwarden installation you can skip ahead to Bitwarden Installation.
This is Part 9a in a series describing a project to create a local WordPress development environment using Docker-Compose. The series is structured as follows:
- Part 1 – Series introduction and creating a simple WordPress app
- Part 2 – Adding a database management tool
- Part 3 – Adding a web server
- Part 4a – Exploring anonymous volumes
- Part 4b – Exploring bind mounts
- Part 4c – Exploring named volumes
- Part 4d – Working with data storage
- Part 5 – Securing passwords with Docker secrets
- Part 6 – Securing network communications with self-signed certificates
- Part 7a – Creating your own certificate authority
- Part 7b – Securing network communications with your own certificate authority
- Part 8 – Hosting multiple WordPress sites on a single database server
- Part 9a – Installing and configuring a Bitwarden password manager
- Part 9b – Hosting Bitwarden behind a reverse proxy server
As I discussed in Part 8, our local WordPress app is largely complete barring some performance, security and other enhancements that I’ll get to in future articles. First up though I want to cover adding a password manager, specifically Bitwarden, to our server. I’ve found it very handy having a password manager incorporated into my development environment to easily serve up passwords to the various sites involved in managing my site. If you struggle in this area and think Bitwarden might help, continue on.
When I first set up my Ubuntu server my main objective was to have it host a local Bitwarden password manager for something unrelated to website development. That setup was straight forward following Bitwarden’s on-premises hosting installation guide. The problem came when I tried to host a WordPress app on the same server as well. That’s not hard to do but required that I access the WordPress app on ports other than port 80 or 443, as Bitwarden uses them by default. As I explained in Part 1 though, I wanted to use standard URLs for accessing my WordPress app rather than having to specify a port in the URL. I needed some other solution to get both these apps up and running on my server in a manner consistent with my goals.
I tried many ways to get both apps running at the same time. In one I assigned other ports to Bitwarden and let my WordPress app use the default ports, but this prevented Bitwarden’s web browser extensions from working properly. I rejected that approach since the browser extension greatly enhances the usefulness of Bitwarden. Finally, I found a discussion about hosting Bitwarden behind a reverse proxy which seemed to be exactly what I wanted. The discussion wasn’t directly applicable to my setup, but it pointed me in the proper direction and with some trial and error I was able to get it working for the most part. The only limitation I found was that the Microsoft Edge browser extension didn’t work. But the Google Chrome extension did so that was sufficient for me. Note: Bitwarden’s browser extension works on the new Microsoft Edge browser, which is based on the same open-source project as Chrome.
As you can see from the diagram of my wife’s development environment, discuss in Part 1, below, I ended up installing the entire Bitwarden app behind the WordPress app’s nginx web server. Seems simple, and in fact, on the WordPress app side, the setup was very similar to what we did in Part 8 when we added additional WordPress services to our app. The tricky part was modifying the stand-alone Bitwarden app to work behind my WordPress app.
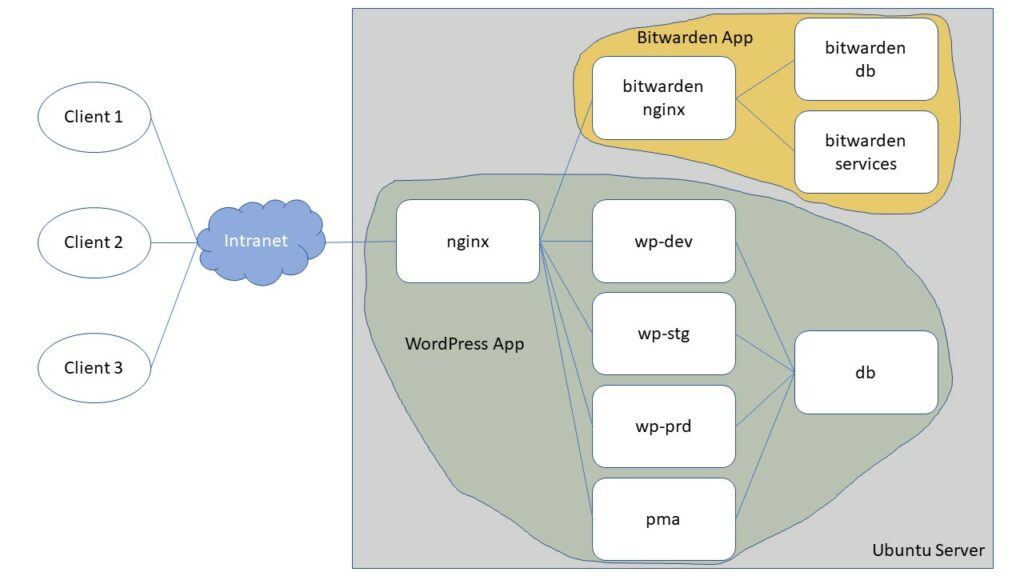
You’ll notice that there are two nginx servers in the setup above, one in the WordPress app and one in the Bitwarden app. The solution here, as I learned in the discussion linked to above, was putting the two nginx services on their own external Docker network and configuring Bitwarden properly. Once done it seems simple, but getting there from scratch needed a bit of trial and error on my part. At the end of Part 9b I discuss an alternate configuration that I tried with the WordPress app served by the Bitwarden nginx service.
Beyond the practical benefits of having a password manager, this tutorial can be generalized to demonstrate some of the other issues that might come up when hosting multiple apps on a server. We’ve already address one consideration in choosing to access our apps via a nginx web server, rather than, for example, a specific port on our server, which we covered in Part 3 – Adding a Web Server to Our Simple WordPress App. We also saw in Part 8 that it is relatively simple to add additional apps by modifying our Compose and nginx configuration files.
But what about more complex apps, especially one that comes configured to communicate over specific ports which might conflict with ones you’re already using? In that case you’ll have a bit of work to do to eliminate any conflicts between the apps and get them working together. This was the case in getting Bitwarden to work with our WordPress app. I’ll step you through it for our WordPress app with something similar to the configuration of my wife’s development environment shown above.
We’re going to be continuing on with our project from Part 8. You can copy the Part 8 directory and rename it. I’ve called mine part-9.
Installing Bitwarden
Installing Bitwarden for self-hosting is straightforward. Simply follow the Host it Yourself instructions on Bitwarden’s download page. I’ve incorporated the appropriate steps at the time of writing below for our project. As previously in this tutorial, I’m going to take a barebones approach at first to just give us a working version of Bitwarden. In a subsequent post I’ll discuss a few other enhancements that you might want to make to your Bitwarden setup, but are too lengthy to cover here.
For starters, I’m going to keep both Bitwarden and our WordPress app together in a single project folder. This makes it easier working through the various parts of this tutorial series. Ultimately though, you might want to separate your apps into different folders. We’ll be installing Bitwarden directly to our part-9 folder. You could also add it to a /bitwarden subdirectory, but I found this didn’t add much separation as Bitwarden already installs most of its files in a subfolder.
First download the Bitwarden master script by running the following command from within your part-9 folder.
curl -Lso bitwarden.sh https://go.btwrdn.co/bw-sh && chmod +x bitwarden.shThis command downloads the Bitwarden master script and makes it executable. You might want to examine the script before proceeding further. The master script provides commands to install, update, rebuild, start, and stop Bitwarden. During the installation of Bitwarden you will need a host id and key. You can get yours here.
Next, install bitwarden using the following command.
./bitwarden.sh installThe Bitwarden installation script will prompt you for information specific to your installation. I’ve shown a sample below as of the time of this writing. The installation script does seem to change from time to time so if additional information is requested from what is presented below then look ahead for additional configuration details.
For our project, provide the information as shown below. I’ll use the local domain bw.local to access Bitwarden but you can use whatever name suits you. Just be sure to use that name in place of bw.local going forward. Bitwarden requires a secure https connection but we’ll handle this with our WordPress app nginx service. As such, reply in the negative, with an ‘n‘, to the three questions related to SSL certificates. When prompted for an installation id and key, provide the ones you obtained above.
 _     _ _                         _
| |__ (_) |___      ____ _ _ __ __| | ___ _ __
| '_ \| | __\ \ /\ / / _` | '__/ _` |/ _ \ '_ \
| |_) | | |_ \ V  V / (_| | | | (_| |  __/ | | |
|_.__/|_|\__| \_/\_/ \__,_|_|  \__,_|\___|_| |_|

Open source password management solutions
Copyright 2015-2020, 8bit Solutions LLC
https://bitwarden.com, https://github.com/bitwarden

===================================================

Docker version 19.03.6, build 369ce74a3c
docker-compose version 1.25.0, build 0a186604

(!) Enter the domain name for your Bitwarden instance (ex. bitwarden.example.com): bw.local

(!) Do you want to use Let's Encrypt to generate a free SSL certificate? (y/n): n

1.33.1: Pulling from bitwarden/setup
Digest: sha256:ceaaa30350dca9dac12bf43e888947cec87633da4f0ab125e89a3e6f9d64ecdb
Status: Image is up to date for bitwarden/setup:1.33.1
docker.io/bitwarden/setup:1.33.1

(!) Enter your installation id (get at https://bitwarden.com/host):

(!) Enter your installation key:

(!) Do you have a SSL certificate to use? (y/n): n

(!) Do you want to generate a self-signed SSL certificate? (y/n): n

Generating key for IdentityServer.
Generating a RSA private key
...............................................++++
.....................................................................................................................................................................++++
writing new private key to 'identity.key'
-----

!!!!!!!!!! WARNING !!!!!!!!!!
You are not using a SSL certificate. Bitwarden requires HTTPS to operate.
You must front your installation with a HTTPS proxy or the web vault (and
other Bitwarden apps) will not work properly.

Building nginx config.
Building docker environment files.
Building docker environment override files.
Building FIDO U2F app id.
Building docker-compose.yml.

Installation complete

If you need to make additional configuration changes, you can modify
the settings in `./bwdata/config.yml` and then run:
`./bitwarden.sh rebuild` or `./bitwarden.sh update`

Next steps, run:
`./bitwarden.sh start`
The Bitwarden installation script creates a folder, bwdata, and populates it with the folders and files needed to run our local copy of the Bitwarden password manager. We could start Bitwarden at this point, but then, as discussed above, we wouldn’t be able to run our WordPress app as Bitwarden, by default, uses ports 80 and 443, the same as our WordPress app. To get them both running together we’ll need to modify the Bitwarden configuration.
Modifying the Bitwarden Base Configuration
Of main interest to us at this point are the /bwdata/docker folder and the Bitwarden configuration file, /bwdata/config.yml. If you’ve been following along with this tutorial series, the contents of the /bwdata/docker folder will be familiar. It contains the Docker Compose file and environment variable files for the Bitwarden services. We’ll be adding a docker-compose.override.yml file to this folder that will connect the Bitwarden nginx service to the one in our WordPress app, allowing the two apps to communicate. We discussed the Compose override file in Part 4b if you’d like to go back and review how to use it.
The /bwdata/config.yml file contains parameters that allow you to change Bitwarden’s installed configuration. This file is mainly used to alter Bitwarden’s default installation options, but can also be used to make changes to the inputs you provided while running the installation script.
Let’s start by modifying the /bwdata/config.yml file. Open the file for editing and make the following changes to the noted Bitwarden variables.
- url: verify the domain name you want to use to access Bitwarden or change it as desired. You’ll need this domain name in several of the changes we’ll be making here and in Part 9b.
- http_port: Bitwarden specifies port 80 by default for client http communications. Since our nginx service will handle these communications we’ll leave this variable blank. That is, delete the 80 currently assigned to this variable. Behind the scenes Bitwarden exposes port 8080 for internal communications. Our WordPress app nginx service will pass client requests to Bitwarden on that port.
- https_port: as above, leave this variable blank. That is, delete the 443 that Bitwarden specifies by default. Behind the scenes Bitwarden exposes port 8443 for https communications. We won’t use this port in Part 9 but will revisit it in a future article so our WordPress app nginx service passes requests to Bitwarden over https protocol.
- push_notifications: I’ve set this to false for my app. If you want to experiment with Bitwarden’s mobile app features you might want to leave this as true.
After you have saved your changes, we need to rebuild Bitwarden to reflect them as follows.
./bitwarden.sh rebuildRebuilding Bitwarden causes the autogenerated configuration files to be regenerated based on the contents of the /bwdata/config.yml file.
Modifying the Bitwarden Docker Compose Configuration
Because our Bitwarden and WordPress apps are separate Docker Compose projects they cannot communicate with each other without modification. Compose provides a top-level key, networks, that we can use to link our applications. We can use this key to specify an external network and then include the networks key in each nginx service to join them to that network. You can learn more about the use of Docker networks in Networking in Compose.
It is a simple matter to create an external network with the docker network create command. Let’s create one named wp-bw-net for use by our applications.
docker network create wp-bw-netThat’s it. You can use the docker network ls command to list the networks docker has created. You should see something like the list below for your system.
NETWORK ID          NAME                DRIVER              SCOPE
8d9d74a8d858        bridge              bridge              local
36c4659a0c70        host                host                local
98a8bfabe62d        none                null                local
9b15b705aba9        wp-bw-net           bridge              local
We can use the wp-bw-net network to support communications between our Bitwarden and WordPress apps. To do so on the Bitwarden side we must modify Bitwarden’s default Docker Compose configuration to allow access to this network. We could do this by modifying Bitwarden’s Compose file, /bwdata/docker/docker-compose.yml, but since this file is automatically generated, any changes would be overwritten if we rebuild Bitwarden again. However, we can use the Compose file override feature we discussed in Part 4b. This allows us to specify additional configuration parameters in a file named docker-compose.override.yml, without modifying the original Compose file. That way, if you ever rebuild Bitwarden, the changes you made in the override file will be preserved.
Create the following Compose override file in the /bwdata/docker folder.
/bwdata/docker/docker-compose.override.yml
version: '3'

services:

  nginx:
    networks:
      - wp-bw-net

networks:
  wp-bw-net:
    external: true
You’ll notice I used Compose file version 3 here, the same as that used by Bitwarden at the time of this writing. You should use the same Compose version as used in your Bitwarden docker-compose.yml file. Our override file adds our external network, wp-bw-net, to the Bitwarden nginx service as follows:
- networks: under the nginx service the networks key directs Compose to join the nginx service to the wp-bw-net, which is defined under the top-level networks key as an external network. Since the network is specified as external, Compose will not create it when we start Bitwarden, but will just check that it exists. If it doesn’t Compose will fail to run with an error that the network could not be found.
Wrapping Up
That’s it on the Bitwarden side of things. Next up we’ll modify our WordPress app to act as a reverse proxy for Bitwarden in Part 9b – Hosting Bitwarden Behind a Reverse Proxy Server.