If you’d just like to dive into the code for adding additional WordPress sites to our simple WordPress app you can skip ahead to Putting It All Together.
This is Part 8 in a series describing a project to create a local WordPress development environment using Docker-Compose. The series is structured as follows:
- Part 1 – Series introduction and creating a simple WordPress app
- Part 2 – Adding a database management tool
- Part 3 – Adding a web server
- Part 4a – Exploring anonymous volumes
- Part 4b – Exploring bind mounts
- Part 4c – Exploring named volumes
- Part 4d – Working with data storage
- Part 5 – Securing passwords with Docker secrets
- Part 6 – Securing network communications with self-signed certificates
- Part 7a – Creating your own certificate authority
- Part 7b – Securing network communications with your own certificate authority
- Part 8 – Hosting multiple WordPress sites on a single database server
- Part 9a – Installing and configuring a Bitwarden password manager
- Part 9b – Hosting Bitwarden behind a reverse proxy server
I discussed in Part 1 how I based this tutorial series on a local WordPress development environment, shown below, that I put together for my wife. Overkill for sure but the fun was in the learning.
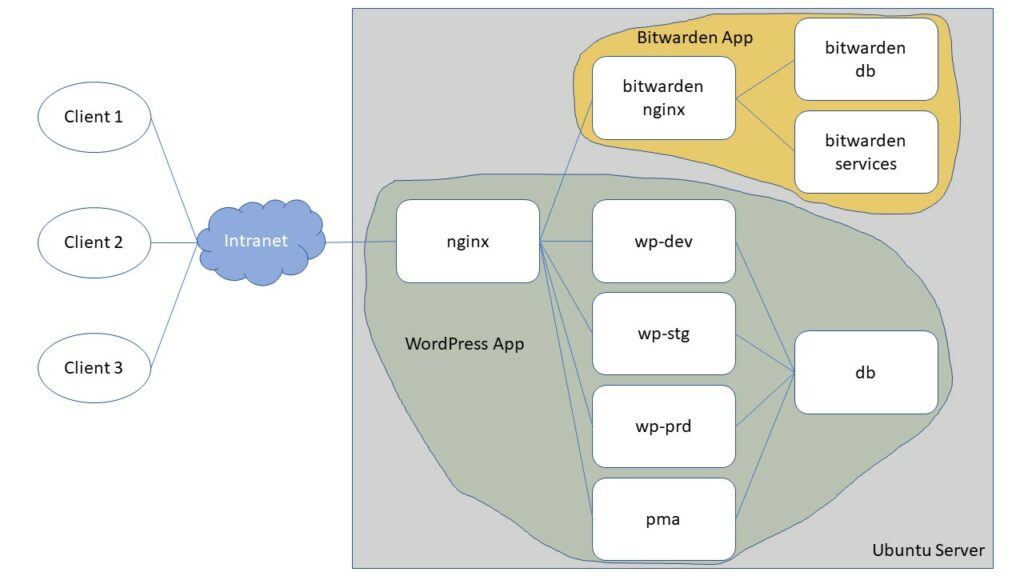
This tutorial series so far has followed the general structure of my wife’s development environment, but I’ve purposefully kept things barebones in this series to make it easier to work through any issues that might arise as you move along in developing you app. I found this a helpful approach when modifying/updating code to run on my server.
Let’s keep with the general structure the development environment shown above and host a total of three WordPress services in our app. I called these wp-dev, wp-stg, and wp-prd in my wife’s app, representing local development, staging and production sites for her WordPress blog. But the WordPress sites you host don’t have to be related to each other or be limited to three sites. You’ll see that the modular nature of Docker Compose containers makes it simple to host more or less. Your limits depend mostly on the resources of your server, though there may be better applications if your hosting ambitions get big.
I’ll also keep with using a single database server to support all of the WordPress services. For me this provides the easiest access to the WordPress databases through a database management tool, such as Adminer that we are using in our tutorial, or perhaps PHPMyAdmin, as in my wife’s development environment above. However, it’s possible to have a separate database server support each WordPress service. This seems to be a common configuration and is demonstrated by William Patton in his excellent article Putting Multiple WordPress Containers into Production. WordPress also offers a Multisite configuration which uses a single database and WordPress installation to support multiple WordPress sites. You can read more about the various options in WordPress.org’s Installing Multiple WordPress Instances. Note that technically I’m using the multiple database option as described in this overview. All of my databases reside on a single server as opposed to having a separate server for each database.
We have the building blocks needed in our existing code to add any number of additional WordPress sites to our app. Our work involves duplicating our existing WordPress container and its respective nginx configuration for each additional WordPress site desired and adding a new SSL key pair to secure communications for each. With just that much information you could probably modify the code on your own but for one wrinkle that makes this exercise a bit more interesting. If you proceed as outlined above, only one of your WordPress sites will be initialized and the others will be inaccessible. Resolving this issue allows us to explore another feature of the MariaDB service.
When a database server supports a single WordPress service, WordPress initializes itself upon first access to the service. But this isn’t the case when a database server supports multiple WordPress services. For example, if you prepare Jin Weijie’s project Run multiple WordPress containers with docker, you’ll notice that the project isn’t functional without the last step, “Import the old backup to new WordPress environment“. This gives us the key to the problem. Some additional initialization is needed when a single database server supports multiple WordPress sites. Once this initialization is done, the multiple WordPress services will function just fine. In Jin Weijie’s case, this initialization was simply uploading an existing WordPress backup. We’ll need to do something different for our app since we don’t have existing sites to upload to our WordPress services.
As we saw in Part 1, we need to have our database service, MariaDB, create our WordPress database for the WordPress installation routine to run properly, at least in Docker Compose without some startup modifications. It turns out that this is the cause of our WordPress initialization problem. MariaDB only provides for the creation of a single database upon creation of the service with the environment variables we’ve been using. But we need a separate database for each WordPress service we add. Without an underlying database we’ll get an “Error establishing a database connection” error when trying to access our WordPress services as discussed in Part 1. Luckily MariaDB provides another way to initialize the database service upon creation and we’ll use this feature to create a separate database for each of our WordPress services.
With that perhaps overly long introduction, we can get to work.
Adding Additional WordPress Services to Our Compose File
Let’s start with adding two additional WordPress services to our simple WordPress app. You can add more or less as desired, but an app with three WordPress services demonstrates the concept of multiple WordPress services nicely.
Let’s start with a copy of our Part 7 folder. I’ve name it part-8. In our Compose file, duplicate the existing WordPress service twice. You’ll need to modify the service name. I’ve used wp2 and wp3. Use these for the volume names as well. Finally, you need to change the mysql_database secret in two places. I’ve used mysql_database2 and mysql_database3. We don’t need any more changes assuming that the same user will be using the WordPress services. If not, you can change mysql_user and mysql_password similarly as well. With those changes we’ve added the following services to our Compose file.
  wp2:
    image: wordpress
    secrets:
      - mysql_database2
      - mysql_user
      - mysql_password
    environment:
      WORDPRESS_DB_HOST: db
      WORDPRESS_DB_NAME_FILE: /run/secrets/mysql_database2
      WORDPRESS_DB_USER_FILE: /run/secrets/mysql_user
      WORDPRESS_DB_PASSWORD_FILE: /run/secrets/mysql_password
    volumes:
      - wp2:/var/www/html

  wp3:
    image: wordpress
    secrets:
      - mysql_database3
      - mysql_user
      - mysql_password
    environment:
      WORDPRESS_DB_HOST: db
      WORDPRESS_DB_NAME_FILE: /run/secrets/mysql_database3
      WORDPRESS_DB_USER_FILE: /run/secrets/mysql_user
      WORDPRESS_DB_PASSWORD_FILE: /run/secrets/mysql_password
    volumes:
      - wp3:/var/www/html
To complete adding our WordPress services to our Compose file we need to add the wp2 and wp3 volumes to the top-level volume key and the mysql_database2 and mysql_database3 secrets to the top-level secrets key.
Now prepare the secrets files referenced in our Compose file. Duplicate the mysql_database file in the /secrets folder to two files, mysql_database2 and mysql_database3. Edit the database name in each of these files to wordpress2 and wordpress3 respectively. With that our WordPress services are configured.
Modifying Database Service to Initialize WordPress Databases
As noted above, as currently configured our database service can only initialize a single WordPress database. As such, only one of our WordPress sites will be accessible in our WordPress app without further modifying our database service. Luckily the Docker MariaDB image provides another way to initialize the service when it is first created. MariaDB does this by executing any files with extensions sh, sql and sql.gz that are found in the container’s docker-entrypoint-initdb.d folder. Thus, the simple solution to our problem is to mount an initialization file that creates a database for each WordPress service to the container’s docker-entrypoint-initdb.d folder.
When it starts up, our MariaDB service will already create the database, wordpress, for our first WordPress service, wp. It will also create our user account, wordpressuser. Thus, we need to create two additional databases, wordpress2 and wordpress3 for our wp2 and wp3 WordPress services respectively. We also need to grant access privileges to these databases to our user account. The commands to perform these are straight forward and can be included in a MariaDB initialization file.
In a new folder that I’ve name /secrets/init, create a file called mkdb.sql. In that file add the following code.
/secrets/init/mkdb.sql
-- create databases
CREATE DATABASE IF NOT EXISTS wordpress2;
CREATE DATABASE IF NOT EXISTS wordpress3;

-- grant access rights to user
GRANT ALL PRIVILEGES ON wordpress2.* TO 'wordpressuser'@'%';
GRANT ALL PRIVILEGES ON wordpress3.* TO 'wordpressuser'@'%';
The first section of this file creates the databases wordpress2 and wordpress3 if they don’t already exist. The second section of the file grants our user, wordpressuser, all privileges to access these databases.
To have the MariaDB service run these commands on startup we only need to mount the /secrets/init folder to /docker-entrypoint-initdb.d. We can do this by adding the following code to our db service volume key in our Compose file.
- ./secrets/init:/docker-entrypoint-initdb.dWith that our Compose file is now complete.
Create Signed Certificates for the New WordPress Services
As with our exiting WordPress service, we’ll access our new WordPress services over a secure network connection with https protocol. As such we’ll need to create key pairs for each new service.
I covered how to create key pairs in Part 7a – Creating Your Own Certificate Authority. If you’ve completed that tutorial, it is a simple matter to create the key pairs for our new WordPress services. Simply run the create-cert.sh script discussed in Part 7a in the /part-8/secrets/certs folder for the wordpress2 and wordpress3 domains.
Next, you’ll need to add the wordpress2 and wordpress3 domains to your hosts file as described in Part 7b – Securing network communications with your own certificate authority. To do this you can simply duplicate the WordPress domain line twice and substitute the wordpress2 and wordpress3 domains for the wordpress domain.
NGINX Configuration File Changes
Last up, we need to configure our web server for our new WordPress services. As with our Compose file above, we can accomplish this by simply copying our existing WordPress associated blocks and editing them for our new WordPress services.
Starting with our nginx configuration file from Part 7, copy the WordPress server blocks for ports 80 and 443 and create similar blocks for our two new WordPress services. Your added servers should look like the following for port 80.
server {
  listen 80;
  listen [::]:80;

  server_name wordpress2;

  return 301 https://wordpress2$request_uri;
}

server {
  listen 80;
  listen [::]:80;

  server_name wordpress3;

  return 301 https://wordpress3$request_uri;
}
They will be like the following for the port 443 servers
server {
  listen 443 ssl http2;
  listen [::]:443 ssl http2;

  server_name wordpress2;

  ssl_certificate /etc/nginx/certs/wordpress2.crt;
  ssl_certificate_key /etc/nginx/certs/wordpress2.key;

  proxy_set_header Host $host;
  proxy_set_header X-Forwarded-Proto https;

  location / {
    proxy_pass http://wp2;
  }
}

server {
  listen 443 ssl http2;
  listen [::]:443 ssl http2;

  server_name wordpress3;

  ssl_certificate /etc/nginx/certs/wordpress3.crt;
  ssl_certificate_key /etc/nginx/certs/wordpress3.key;

  proxy_set_header Host $host;
  proxy_set_header X-Forwarded-Proto https;

  location / {
    proxy_pass http://wp3;
  }
}
And that’s it. Any requests to our new WordPress services over http protocol will be automatically redirected to the https server for those services which will pass the requests on to their respective WordPress services.
Putting It All Together
Start with a copy of the project folder from Part 7. I’ve labeled my folder part-8.
Our final Compose file is as follows:
Updated docker-compose.yml file with multiple WordPress services
version: '3.7'

services:
  db:
    image: mariadb
    secrets:
      - mysql_root_password
      - mysql_database
      - mysql_user
      - mysql_password
    environment:
      MYSQL_ROOT_PASSWORD_FILE: /run/secrets/mysql_root_password
      MYSQL_DATABASE_FILE: /run/secrets/mysql_database
      MYSQL_USER_FILE: /run/secrets/mysql_user
      MYSQL_PASSWORD_FILE: /run/secrets/mysql_password
    volumes:
      - db:/var/lib/mysql
      - ./secrets/init:/docker-entrypoint-initdb.d

  wp:
    image: wordpress
    secrets:
      - mysql_database
      - mysql_user
      - mysql_password
    environment:
      WORDPRESS_DB_HOST: db
      WORDPRESS_DB_NAME_FILE: /run/secrets/mysql_database
      WORDPRESS_DB_USER_FILE: /run/secrets/mysql_user
      WORDPRESS_DB_PASSWORD_FILE: /run/secrets/mysql_password
    volumes:
      - wp:/var/www/html

  wp2:
    image: wordpress
    secrets:
      - mysql_database2
      - mysql_user
      - mysql_password
    environment:
      WORDPRESS_DB_HOST: db
      WORDPRESS_DB_NAME_FILE: /run/secrets/mysql_database2
      WORDPRESS_DB_USER_FILE: /run/secrets/mysql_user
      WORDPRESS_DB_PASSWORD_FILE: /run/secrets/mysql_password
    volumes:
      - wp2:/var/www/html

  wp3:
    image: wordpress
    secrets:
      - mysql_database3
      - mysql_user
      - mysql_password
    environment:
      WORDPRESS_DB_HOST: db
      WORDPRESS_DB_NAME_FILE: /run/secrets/mysql_database3
      WORDPRESS_DB_USER_FILE: /run/secrets/mysql_user
      WORDPRESS_DB_PASSWORD_FILE: /run/secrets/mysql_password
    volumes:
      - wp3:/var/www/html

  adminer:
    image: adminer

  nginx:
    image: nginx
    ports:
      - "80:80"
      - "443:443"
    volumes:
      - ./nginx:/etc/nginx/conf.d
      - ./secrets/certs:/etc/nginx/certs

volumes:
  db:
  wp:
  wp2:
  wp3:

secrets:
  mysql_root_password:
    file: ./secrets/mysql_root_password
  mysql_database:
    file: ./secrets/mysql_database
  mysql_database2:
    file: ./secrets/mysql_database2
  mysql_database3:
    file: ./secrets/mysql_database3
  mysql_user:
    file: ./secrets/mysql_user
  mysql_password:
    file: ./secrets/mysql_password
Our new secrets files are as follows:
/secrets/mysql_database2
wordpress2/secrets/mysql_database3
wordpress3Our final nginx configuration file is as follows:
Updated nginx/nginx.conf file for multiple WordPress services
server {
  listen 80;
  listen [::]:80;

  server_name wordpress;

  return 301 https://wordpress$request_uri;
}

server {
  listen 80;
  listen [::]:80;

  server_name wordpress2;

  return 301 https://wordpress2$request_uri;
}

server {
  listen 80;
  listen [::]:80;

  server_name wordpress3;

  return 301 https://wordpress3$request_uri;
}

server {
  listen 80;
  listen [::]:80;

  server_name adminer;

  return 301 https://adminer$request_uri;
}

server {
  listen 443 ssl http2;
  listen [::]:443 ssl http2;

  server_name wordpress;

  ssl_certificate /etc/nginx/certs/wordpress.crt;
  ssl_certificate_key /etc/nginx/certs/wordpress.key;

  proxy_set_header Host $host;
  proxy_set_header X-Forwarded-Proto https;

  location / {
    proxy_pass http://wp;
  }
}

server {
  listen 443 ssl http2;
  listen [::]:443 ssl http2;

  server_name wordpress2;

  ssl_certificate /etc/nginx/certs/wordpress2.crt;
  ssl_certificate_key /etc/nginx/certs/wordpress2.key;

  proxy_set_header Host $host;
  proxy_set_header X-Forwarded-Proto https;

  location / {
    proxy_pass http://wp2;
  }
}

server {
  listen 443 ssl http2;
  listen [::]:443 ssl http2;

  server_name wordpress3;

  ssl_certificate /etc/nginx/certs/wordpress3.crt;
  ssl_certificate_key /etc/nginx/certs/wordpress3.key;

  proxy_set_header Host $host;
  proxy_set_header X-Forwarded-Proto https;

  location / {
    proxy_pass http://wp3;
  }
}

server {
  listen 443 ssl http2;
  listen [::]:443 ssl http2;

  server_name adminer;

  ssl_certificate /etc/nginx/certs/adminer.crt;
  ssl_certificate_key /etc/nginx/certs/adminer.key;

  proxy_set_header Host $host;
  proxy_set_header X-Forwarded-Proto https;

  location / {
    proxy_pass http://adminer:8080;
  }
}
Our MariaDB initialization file is as follows:
/secrets/init/mkdb.sql
-- create databases
CREATE DATABASE IF NOT EXISTS wordpress2;
CREATE DATABASE IF NOT EXISTS wordpress3;

-- grant access rights to user
GRANT ALL PRIVILEGES ON wordpress2.* TO 'wordpressuser'@'%';
GRANT ALL PRIVILEGES ON wordpress3.* TO 'wordpressuser'@'%';
Finally, make sure you’ve created the key/certificate pairs and edited your hosts file for our new WordPress services as discussed in Create Signed Certificates for the New WordPress Services above. Assuming you’ve created your own Certificate Authority per Part 7a, then your all set to go.
You can now start up your WordPress app with docker-compose up -d.
Once your database is initialized you can visit the WordPress apps in your browser with https://wordpress, https://wordpress2, and https://wordpress3 and your Adminer service with https://adminer. You can also use http:// and nginx will redirect your request to a https connection. If you’ve properly created the SSL key pairs then you should be taken directly to your services.
Wrapping Up
Our WordPress app is getting a bit more complex with six services in our Compose file. At this point I’ve found that my barebones approach to our project so far starts to breakdown a bit. When starting up our app from scratch with the docker-compose up -d command, I’ve found my nginx service fails about once in every five starts or so. The failure rate is even higher if you’re starting your app with its volumes already created. What’s going on? Let’s investigate.
First off, how can you even tell if your nginx service has failed to start? Your first indication will likely be not being able to access the web page for one of your services. Depending on your browser you might get an error such as “Can’t reach this page” or “This site can’t be reached”. If you’ve been able to reach your site before with no problem then a failure in your web server is a possible cause.
The first step you’ll want to take is to verify the status of your service’s containers with the docker ps -a command. The -a option is important here as it shows all containers not just the running containers which is the default. If your nginx service hasn’t started you’ll likely see something like this
~$ docker ps -a
CONTAINER ID        IMAGE               COMMAND                  CREATED             STATUS                      PORTS               NAMES
fd7a7c7b70b9        wordpress           "docker-entrypoint.s…"   30 seconds ago      Up 22 seconds               80/tcp              part-8_wp2_1
a5d9a596361c        wordpress           "docker-entrypoint.s…"   30 seconds ago      Up 19 seconds               80/tcp              part-8_wp3_1
a292db46dec6        mariadb             "docker-entrypoint.s…"   30 seconds ago      Up 23 seconds               3306/tcp            part-8_db_1
00099d4ffade        adminer             "entrypoint.sh docke…"   30 seconds ago      Up 21 seconds               8080/tcp            part-8_adminer_1
7c66a95a0e8e        nginx               "nginx -g 'daemon of…"   30 seconds ago      Exited (1) 24 seconds ago                       part-8_nginx_1
32eec833b3d6        wordpress           "docker-entrypoint.s…"   30 seconds ago      Up 20 seconds               80/tcp              part-8_wp_1
You can see from the status information above, the nginx container failed soon after it was created. We can look at the nginx logs with the docker logs part-8_nginx_1 command to see what the problem is. With this command you’ll see something like
~$ docker logs -f part-8_nginx_1
2020/04/12 18:44:51 [emerg] 1#1: host not found in upstream "wp" in /etc/nginx/conf.d/nginx.conf:50
nginx: [emerg] host not found in upstream "wp" in /etc/nginx/conf.d/nginx.conf:50
In this case we can see that the nginx container failed to start because it couldn’t find the container for our WordPress service, wp. We can easily remedy this problem using the docker start part-8_nginx_1 command. But as I mentioned in Part 1, Compose provides the depends_on key to control the startup order of our services. We can modify our Compose file to add this key as follows to our nginx service
    depends_on:
      - wp
      - wp2
      - wp3
      - adminer
Here I’ve specified that the nginx service depends on the wp, wp2, wp3 and adminer services. From my experience, any of these could cause the nginx container to fail after starting. If you’ve added this key to your nginx service, the next time you start you project you’ll see that the nginx container will not start until the containers for these services have been started. I’ll be incorporating this key going forward to keep from having any startup order issues. You might want to do likewise but it isn’t absolutely necessary. It will become more important when we discuss automatically restarting your app in a future article.
At this point in this tutorial series we have created a pretty basic, but still powerful, application which can handle multiple WordPress sites. You could consider your app complete at this point but I will cover some performance and security enhancements in a future article. Next up though is adding a password manager which I’ve broken into two parts, starting with Part 9a – Installing and configuring a password manager. Though that tutorial is specific to adding a password manager, the process discussed could be generalized to overcoming the problems of adding other standalone apps behind our nginx web server.