This is Part 7a in a series describing a project to create a local WordPress development environment using Docker-Compose. The series is structured as follows:
- Part 1 – Series introduction and creating a simple WordPress app
- Part 2 – Adding a database management tool
- Part 3 – Adding a web server
- Part 4a – Exploring anonymous volumes
- Part 4b – Exploring bind mounts
- Part 4c – Exploring named volumes
- Part 4d – Working with data storage
- Part 5 – Securing passwords with Docker secrets
- Part 6 – Securing network communications with self-signed certificates
- Part 7a – Creating your own certificate authority
- Part 7b – Securing network communications with your own certificate authority
- Part 8 – Hosting multiple WordPress sites on a single database server
- Part 9a – Installing and configuring a Bitwarden password manager
- Part 9b – Hosting Bitwarden behind a reverse proxy server
In Part 6 we implemented https protocol to secure communications with our WordPress app using a self-signed certificate. This might be a sufficient means for many folks to secure their network communications especially if they are just testing that their app works appropriately with the https protocol in their development environment. It does have a limitation though in that it requires you to install a certificate on your PC for each app or service you intend to access on your server. Creating your own certificate authority to sign your apps’ certificates gets around this limitation by only requiring the installation of the root certificate on your PC. With that all certificates signed with this root certificate will be trusted on your PC.
In Part 7, we’ll be discussing creating and using your own certificate authority to secure network communications with you WordPress app. Because it’s a lot to cover, I’ve broken Part 7 into two posts. In this post I’ll cover setting up your own certificate authority and in the next I’ll cover using it to secure communications with our WordPress app. In that post I’ll also discuss accessing our app’s services with an app specific domain name rather than using the server’s hostname or IP address. This fulfills another goal for the development environment laid out in Part 1.
Creating a Certificate Authority with OpenSSL
Creating a self-signed certificate to secure network communications, as we did in Part 6, only required a single OpenSSL command. Creating your own Certificate Authority with OpenSSL to sign your apps’ certificates is more involved, but not significantly so. You can also find apps on the web to manage the entire process for you, but for my purposes that’s overkill and in any case it’s nice to learn what’s going on behind the scenes.
OpenSSL is a powerful tool that you can use to manage your certificates but I’ll only be covering the barebones commands needed for our simple app. Jamie Nguyen put together a much more comprehensive walkthrough of creating an OpenSSL Certificate Authority that I found to be very informative in understanding the process. Note that it is a little out of date and likely overkill for many projects, but it demonstrates some of the certificate management capabilities of OpenSSL. Jamie’s writeup is especially useful in describing the OpenSSL configuration file that can be used in creating certificates.
For the barebones commands needed here, I’ll be modifying/updating slightly those used by Brad Touesnard in How to Create Your Own SSL Certificate Authority. Some of his readers have provided links to scripts that totally automate his process. You might want to check if they meet your needs. I’ll be taking a hybrid approach by manually creating and installing the Certificate Authority certificate and using a modification of a script created by one of his readers to create signed certificates for our app’s services.
This hybrid approach involves only a few steps:
- Create Certificate Authority private key
- Create Certificate Authority root certificate
- Install root certificate to PC
- Create signed certificate by running a script which performs the following
- Create private key for certificate
- Create a certificate signing request
- Specify extensions to be used in creating the certificate
- Create and sign the certificate
Let’s start with a copy of our part-6 folder, I’ll name it part-7. We’ll produce a number of files in creating our signed certificates, only a portion of which will be needed beyond this step. I’m going to work in our part-7/secrets/certs folder in creating these files. You may want to work in a separate directory but will ultimately need to move your SSL certificate and private key to this folder or modify your nginx configuration file accordingly.
Create Certificate Authority Private Key
From within the part-7/secrets/certs folder, generate an RSA private key with the openssl genrsa command.
openssl genrsa -aes256 -out rootCA.keyThe command above will generate a 2048 bit key, the default length, and uses the following options:
- aes256: specifies the use of a 256-bit AES cypher to encrypt the private key. You’ll be prompted for a pass phrase when the key is generated. You’ll need that pass phrase to sign any certificates with this key. You’ll want to keep this pass phrase secure as your browser will trust any certificates signed with this private key.
- out: specifies that the private key will be output to the file rootCA.key in the current folder. You can specify any filename here, but if you do, you’ll need to use it in the upcoming sections instead of the one above.
Technically genrsa has been superseded by genpkey which allows for more options. Genrsa also uses an older key format, PKCS#1, vs PKCS#8 for genpkey. There are applications where one or the other may be needed. For our local development environment, genrsa should be adequate. If you go beyond that you’ll likely want to do some more research on the most up-to-date practices.
Create Certificate Authority Root Certificate
We’ve already used the openssl req command with the -x509 option to create our self-signed certificate in Part 6. We’ll use it again here to create the root certificate of our Certificate Authority. In fact, all root certificates are self-signed.
From within the part-7/secrets/certs folder, generate the root certificate of our Certificate Authority with the following command.
openssl req -x509 -sha256 -days 3650 -key rootCA.key -out rootCA.crtYou’ll be prompted for the pass phrase for the rootCA.key private key. As with our self-signed certificate in Part 6, you’ll also be prompted for information regarding the certificate. These can be anything that will help you identify the certificate in the future. Unlike when we created out self-signed certificate, there isn’t any specific requirement for the Common Name field for our root certificate.
In the command above, we use the following options:
- x509: generate a self-signed certificate rather than a certificate request.
- sha256: the certificate is signed with this digest or hash.
- days 3650: the certificate will be valid for 3650 days or 10 years. You want your root certificate to have a rather long life as all of the certificates signed by it will expire when it does.
- key: specifies to use our private key generated above, rootCA.key, in generating the certificate. You will be prompted for the pass phrase.
- out: the root certificate filename, rootCA.crt, will be created in the current folder.
Install Root Certificate to Your PC
We now need to install your root certificate, rootCA.crt, on your PC. The process is the same as we used in Part 6. First, you’ll need to transfer the certificate, rootCA.crt, from your local server to your PC. I sometimes use WinSCP to do this, but a USB stick might be just as handy for the transfer here.
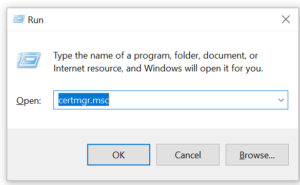
With the certificate on your PC you’re ready to install it. I’ll show the process for Windows 10. If you’re using another operating system the process will be somewhat different. On Windows 10, import the certificate into your trusted certificate store using Windows certificate manager, which you can start by running certmgr.msc in the Windows Run command box as we did in Part 6.
With the certificate manager running, import your certificate into the Trusted Root Certification Authorities store by right clicking on this item and selecting All Tasks and then Import.
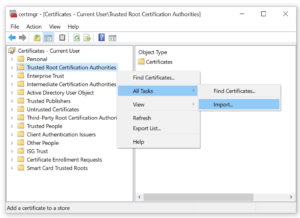
Follow the prompts, selecting the default selections. At one point you’ll be asked to browse to your certificate file. Select the file you transferred to your PC above and then click through several more prompts/warnings. In the end the certificate manager will note that the certificate was imported successfully. And that’s it. Now all certificates signed with your Certificate Authority will be trusted by browsers on your PC. Note that you may have to restart your browser for changes in your trusted certificate store to be recognized.
Create Signed Certificates
We now have to create a key pair for each app or service we want access securely on our server. The key pair consists of a public key, or certificate, to encrypt data and a private key used to decrypt the data. The certificate will be signed with the Certificate Authority we created above. This involves three additional OpenSSL commands and the preparation of an extensions file to be used in creating the certificate. This provides a good opportunity to incorporate the Subject Alterative Name extension required by some browsers.
As mentioned above, I’ve modified a script written by a commenter of Brad Touesnard’s article on creating a Certificate Authority to perform the steps we need. My script, create-cert.sh shown below, requires you to respond to the same prompts as when creating a self-signed certificate. Other scripts are available that completely automate the process. Check out the comments in the link to Brad’s article above for some scripts that may be more appropriate to your needs. A Google search will reveal even more. I prefer a basic script over a more complex one, so that I can easily verify/modify/maintain it. Your preferences may differ, but in any case, you should fully understand any third-party scripts before running them.
create-cert.sh – Usage: create-cert.sh DOMAIN
# modified from: https://gist.github.com/polevaultweb/c83ac276f51a523a80d8e7f9a61afad0
#!/bin/sh

if [ "$#" -ne 1 ]
then
  echo "Usage: Must supply a domain"
  exit 1
fi

DOMAIN=$1

openssl genrsa -out $DOMAIN.key
openssl req -new -key $DOMAIN.key -out $DOMAIN.csr

cat > $DOMAIN.ext << EOF
authorityKeyIdentifier=keyid,issuer
basicConstraints=CA:FALSE
keyUsage = digitalSignature, nonRepudiation, keyEncipherment, dataEncipherment
subjectAltName = @alt_names
[alt_names]
DNS.1 = $DOMAIN
EOF

openssl x509 -req -in $DOMAIN.csr -CA rootCA.crt -CAkey rootCA.key -CAcreateserial  -out $DOMAIN.crt -days 1825 -sha256 -extfile $DOMAIN.ext
The create-cert.sh script takes one argument, the domain name you wish to use for your app or service.
create-cert.sh DOMAINThe script performs the following three OpenSSL commands:
openssl genrsa -out $DOMAIN.keySimilar to the private key we created for our Certificate Authority above, this command generates a 2048 bit key with the supplied domain name in the current folder. Unlike the Certificate Authority key however, we haven’t encrypted this key as nginx will need to access the unencrypted key.
openssl req -new -key $DOMAIN.key -out $DOMAIN.csrThe openssl req command with the new option creates a new certificate request, an intermediate step in creating a certificate signed by our Certificate Authority. The command creates a certificate signing request file, DOMAIN.csr, in the current folder.
openssl x509 -req -in $DOMAIN.csr -CA rootCA.crt -CAkey rootCA.key -CAcreateserial -out $DOMAIN.crt -days 1825 -sha256 -extfile $DOMAIN.extThe openssl x509 command is used to create a certificate signed by a Certificate Authority. Don’t confuse this with the openssl req command with the x509 option that we used above when creating our Certificate Authority or our self-signed certificate in Part 6. While various OpenSSL command may perform similar functions they often provide for different options and functionality. One command or another may be more appropriate depending on what you are trying to accomplish and how much control you want over the process and the defaults used in creating the certificate.
A few of the options we use in the command above are similar to those discussed when we created the Certificate Authority. I won’t cover them again here. The options we haven’t discussed yet are:
- req: specifies that we will provide a certificate request.
- in: specifies the certificate request, DOMAIN.csr, created in the last step.
- CA: our Certificate Authority certificate.
- CAkey: our Certificate Authority private key. We’ll be prompted for the pass phrase before the creation of our signed certificate.
- CAcreateserial: tells OpenSSL to create a serial number file, if it doesn’t already exist, to store a serial number to be used in creating the signed certificate. After each use, the serial number in this file will be incremented and written to the file. This option is required unless you specify a serial number file separately.
- extfile: specifies the file containing certificate extensions to use. OpenSSL extensions customize the certificate for various uses. They may be included in the OpenSSL configuration file, in an extension file, or in the command line depending on the particular OpenSSL command being used. Sometimes a particular OpenSSL command provides an easier way to accomplish the same task. For example, we could create our signed certificate with the openssl ca command as well, but with different options specified. We specify the following extensions in DOMAIN.ext which is created automatically by our script. Note that these extensions are typical for a web-based app. You may need to modify and/or expand them for other applications.
- authorityKeyIdentifier: keyid specifies that the subject key identifier is copied from the parent certificate if available or if not, then issuer specifies that the issuer and serial number of the issuer certificate be copied instead.
- basicConstraints: CA is set to true for Certificate Authority certificates. It must be set to false for end user certificates or the certificate must exclude this extension entirely. Note that some software may require this extension to be set to false for end user certificates so it is included here.
- keyUsage: contains a list of permitted key usages. Ours can be used to:
- digitalSignature: verify a digital signature.
- nonrepudiation: prevents the signing entity from denying actions taken with the certificate
- keyEncipherment: encrypt a key which will be used to encrypt and decrypt information with a target
- dataEncipherment: directly encrypt and decrypt application data
- subjectAltName: specifies the Subject Alternate Name for our domain. This is required by some browsers for the certificate to be trusted.
Run the script in the folder with your root certificate and private key and it will create the private key, DOMAIN.key, and certificate, DOMAIN.crt, in that folder. If you haven’t already done so, you’ll need to make the script executable with chmod +x create-cert.sh. The script will also create the files DOMAIN.csr and DOMAIN.ext which are the certificate signing request and extension file for the specified domain. You can delete these files if you wish as they won’t be needed after the certificate has been created.
Let’s create two key pairs for our project, one for our WordPress service and another for our Adminer service. We can do this easily with the create-cert.sh script above. You can also do it manually by following the commands used in the script. We need to specify a domain name to use when accessing the services on our local network. Let’s use wordpress and adminer. I’ll run the script in a subfolder, part-7/secrets/certs, to keep all of the files neatly organized.
./create-cert.sh wordpressYou’ll be prompted as follows. You can skip all entries except for Common Name, which is the domain name you used in the create-cert.sh command, wordpress here, and the pass phrase for your Certificate Authority key, rootCA.key.
~/part-7/ca$ ./create-cert.sh wordpress
Generating RSA private key, 2048 bit long modulus (2 primes)
......................+++++
................................................................................................................................................................................................................................+++++
e is 65537 (0x010001)
Can't load /home/.rnd into RNG
139990555759040:error:2406F079:random number generator:RAND_load_file:Cannot open file:../crypto/rand/randfile.c:88:Filename=/home/.rnd
You are about to be asked to enter information that will be incorporated
into your certificate request.
What you are about to enter is what is called a Distinguished Name or a DN.
There are quite a few fields but you can leave some blank
For some fields there will be a default value,
If you enter '.', the field will be left blank.
-----
Country Name (2 letter code) [AU]:
State or Province Name (full name) [Some-State]:
Locality Name (eg, city) []:
Organization Name (eg, company) [Internet Widgits Pty Ltd]:
Organizational Unit Name (eg, section) []:
Common Name (e.g. server FQDN or YOUR name) []:wordpress
Email Address []:

Please enter the following 'extra' attributes
to be sent with your certificate request
A challenge password []:
An optional company name []:
Signature ok
subject=C = AU, ST = Some-State, O = Internet Widgits Pty Ltd, CN = wordpress
Getting CA Private Key
Enter pass phrase for rootCA.key:
Similarly, let’s create a key/certificate pair for the Adminer service.
./create-cert.sh adminer~/Documents/part-7/ca$ ./create-cert.sh adminer
Generating RSA private key, 2048 bit long modulus (2 primes)
..............................................+++++
....+++++
e is 65537 (0x010001)
Can't load /home/.rnd into RNG
140539609547200:error:2406F079:random number generator:RAND_load_file:Cannot open file:../crypto/rand/randfile.c:88:Filename=/home/.rnd
You are about to be asked to enter information that will be incorporated
into your certificate request.
What you are about to enter is what is called a Distinguished Name or a DN.
There are quite a few fields but you can leave some blank
For some fields there will be a default value,
If you enter '.', the field will be left blank.
-----
Country Name (2 letter code) [AU]:
State or Province Name (full name) [Some-State]:
Locality Name (eg, city) []:
Organization Name (eg, company) [Internet Widgits Pty Ltd]:
Organizational Unit Name (eg, section) []:
Common Name (e.g. server FQDN or YOUR name) []:adminer
Email Address []:
Please enter the following 'extra' attributes
to be sent with your certificate request
A challenge password []:
An optional company name []:
Signature ok
subject=C = AU, ST = Some-State, O = Internet Widgits Pty Ltd, CN = adminer
Getting CA Private Key
Enter pass phrase for rootCA.key:Of the files created by the script, four will be of interest to us going forward: wordpress.key, wordpress.crt, adminer.key, and adminer.crt. We’ll use these along with our root certificate, rootCA.crt, in securing our network communications with our WordPress app.
Wrapping Up
We’re now ready to modify our WordPress app to incorporate our new certificates. We also need to modify our PC’s hosts file to direct the domain names we gave to our services above to our server’s IP address. That way we can access our WordPress and Adminer services with https://wordpress and https://adminer rather than our server’s hostname or IP address. We’ll cover all this in Part 7b – Securing Network Communications with Your Own Certificate Authority.