If you’d just like to dive into the code to secure network communications for the simple WordPress app you can skip ahead to Putting It All Together.
This is Part 6 in a series describing a project to create a local WordPress development environment using Docker-Compose. The series is structured as follows:
- Part 1 – Series introduction and creating a simple WordPress app
- Part 2 – Adding a database management tool
- Part 3 – Adding a web server
- Part 4a – Exploring anonymous volumes
- Part 4b – Exploring bind mounts
- Part 4c – Exploring named volumes
- Part 4d – Working with data storage
- Part 5 – Securing passwords with Docker secrets
- Part 6 – Securing network communications with self-signed certificates
- Part 7a – Creating your own certificate authority
- Part 7b – Securing network communications with your own certificate authority
- Part 8 – Hosting multiple WordPress sites on a single database server
- Part 9a – Installing and configuring a Bitwarden password manager
- Part 9b – Hosting Bitwarden behind a reverse proxy server
Up to now we’ve used unsecure network communications in this series. This means that any sensitive information is flowing over your network unencrypted. This may not be a problem if you’re just using your local WordPress app for testing. But, if like me, you’re creating a WordPress development environment, you’ll likely want to secure your network communications to make your development environment as similar to your production site as possible. In fact, accessing the local development site with https protocol was one of the main goals of this series set out in Part 1 – Creating a WordPress Development Environment with Docker-Compose.
Securing network communications can add quite a bit of complexity to what has been a fairly simple code base for us so far. However, in keeping with our barebones approach, for the next several articles I’m only going to include just the code needed to encrypt our communications. I’ll cover additional security and performance enhancements in a future article.
Further complicating matters, we also need to create one or more SSL certificates to allow us to connect to our WordPress app with the https protocol. Because of the complexity and range of options, I’m splitting this discussion into several parts. In Part 6, we’ll set up secure communications with a self-signed SSL certificate. In Parts 7a and b, we’ll secure communications with a SSL certificate that we sign with our own Certificate Authority.
We’ll be using OpenSSL to create our certificates. If you’re using Ubuntu 18.04 it should be preinstalled. If OpenSSL isn’t installed on your system, you’ll want to install it before moving on.
Self-signed SSL certificates work just fine for a local development environment but are somewhat inconvenient because a separate certificate has to be installed on every computer for each service you want to access. In Part 7, we solve this by creating our own Certificate Authority to sign the certificates for each of our services. We then only have to install this Certificate Authority certificate on our computer to allow validation of each service’s individual certificate. In a future article, I’ll also discuss additional configuration details for the https protocol to improve communication security and performance. While communications with your web app will be encrypted without these additional details, it will not be as secure as it could be. I’ll also be pointing out some resources you may want to consult for your particular situation to enhance your network communications further.
Lastly, a caveat. The ultimate goal here is to establish https protocol on a local network where security threats are assumed to be low. This allows us to test that any changes to our WordPress development site work well with the https protocol before implementing them on a production site which likely has an entirely different setup to secure your website. I do not recommend using the nginx configuration developed here for a production site or even a development site that you’ll access remotely over the internet. For those purposes you’ll want to develop your nginx configuration file consistent with your needs. WordPress and nginx both provide sample nginx configurations for WordPress sites. My own development environment uses a nginx configuration very similar to the nginx example. I’ll cover this in a future article.
I’ll be starting with the files we used in Part 5 – Securing Passwords with Docker Secrets. Create a new folder containing a copy of the folders/files from Part 5. I’ll label the folder part-6.
A Short Word About Browsers
If you’re using Google Chrome or the new Microsoft Edge (and possibly others), you may want to skip ahead to Part 7a – Creating Your Own Certificate Authority, as the self-signed certificate created below is no longer accepted by these browsers. I discuss the problem below and how you can get your self-signed certificate working with these browsers, but I view the solution discussed in Part 7 to be more practical.
Creating a Self-Signed Certificate with OpenSSL
SSL certificates allow a secure connection to websites through https protocols. If your website has a public domain name you can obtain a certificate from a Certificate Authority, such as Let’s Encrypt which issues certificates at no charge. But as our local WordPress app doesn’t have a public domain name, we’ll be using the OpenSSL toolkit to produce self-signed SSL certificates to allow https connection over a local network. We can then install this certificate in our computer’s trusted certificate store to allow a https connection to our WordPress app.
OpenSSL has numerous commands and options. We’ll be using the openssl req command which is an OpenSSL certificate generating utility. Since our certificate files will be sensitive, let’s put them in a new /part-6/secrets/certs folder. To create a self-signed certificate, execute the following command in this folder.
openssl req -x509 -nodes -days 365 -newkey rsa:2048 -keyout ./private.key -out ./certificate.crtWe use the following options with the openssl req command:
- x509: generates a self-signed certificate rather than a certificate request.
- nodes: the private key is not encrypted.
- days 365: the certificate will be valid for 365 days. You can set this to a desired number of days. The default is 30 days. You can select a longer period if you desire.
- newkey rsa:2048: create a new RSA private key 2,048 bits in size.
- keyout: the private key, named private.key, will be created in the current folder.
- out: the self-signed certificate, named certificate.crt, will be created in the current folder.
The openssl req command will prompt you for information regarding your self-signed certificate as shown below. The only required line is the one starting with Common Name. On this line you need to input the IP address or hostname of the computer hosting your WordPress app. I like using the hostname, but on some PCs, I have trouble accessing my server with it. If you have a similar problem, then use its IP address here instead. For the other lines you can enter information as desired or simply skip them by pressing the enter key.
openssl req -x509 -nodes -days 365 -newkey rsa:2048 -keyout ./private.key -out ./certificate.crt
Can't load /home/.rnd into RNG
140241415336384:error:2406F079:random number generator:RAND_load_file:Cannot open file:../crypto/rand/randfile.c:88:Filename=/home/.rnd
Generating a RSA private key
.+++++
...........+++++
writing new private key to './private.key'
-----
You are about to be asked to enter information that will be incorporated
into your certificate request.
What you are about to enter is what is called a Distinguished Name or a DN.
There are quite a few fields but you can leave some blank
For some fields there will be a default value,
If you enter '.', the field will be left blank.
-----
Country Name (2 letter code) [AU]:
State or Province Name (full name) [Some-State]:
Locality Name (eg, city) []:
Organization Name (eg, company) [Internet Widgits Pty Ltd]:
Organizational Unit Name (eg, section) []:
Common Name (e.g. server FQDN or YOUR name) []:<IP address or hostname>
Email Address []:
With that complete our self-signed certificate, certificate.crt, and its private key, private.key, are now in our /part-6/secrets/certs folder. We’ll be creating references to these files later in our nginx configuration file.
Compose File Changes for HTTPS
We need to make a few changes to the nginx service in our Compose file to enable https communication in our WordPress app. Make the following changes to the nginx service in your Compose file (the full file is shown below in Putting it All Together):
- Add the default https port, 443, to the nginx service ports key. We could specify any port here, but we’ll use the default port for https protocol so we don’t have to specify the port when accessing our WordPress app. Remember to observe the required indentation. Compose will complain on start up if it’s not exactly right.
- "443:443"- Add the following volume to the nginx service volume key. This line mounts our secrets/certs folder to the nginx service etc/nginx/certs folder allowing the service to access our self-signed certificate and private key.
- ./secrets/certs:/etc/nginx/certsNGINX Configuration File Changes for HTTPS
We have more extensive changes to make to our nginx configuration file. Even so, to keep things simple I’m only going to make the barebones changes needed to enable https communications. I’ve found that including too many enhancements at this point is more likely to create confusion and possibly break you app. The barebones configuration will allow encrypted communications with your WordPress app but will still leave open many vulnerabilities. These shouldn’t be of much concern for a simple local test app but you’ll likely want to add some of the many performance and security enhancements to this configuration as you further develop your local environment. I’ll review some of the enhancements I’ve made in my own environment later in this series and perhaps implement some of them in our simple app as well.
Make the following changes to the nginx configuration file (the full file is shown below in Putting it All Together).
- Add the following listen directives to the server block above the proxy_set_header line. These specify that this server block will process requests for port 80, the default http port. Note that nginx isn’t a stickler about indentation like Compose is, but using the indentation that I’ve provided will make your nginx configuration file more readable.
  listen 80;
listen [::]:80;- In the location / block replace the proxy_pass line with the following line. This line will redirect all http traffic to our WordPress service to a new https server block, which we’ll add next. As before this location block acts as the default so any non-Adminer requests will be directed to the host over the https protocol. For simplicity, we’ll continue to access Adminer with http protocol.
return 301 https://$host$request_uri;- Add a new server block to support https communications. This block forwards all requests to our WordPress service.
server {
  listen 443 ssl http2;
  listen [::]:443 ssl http2;

  ssl_certificate /etc/nginx/certs/certificate.crt;
  ssl_certificate_key /etc/nginx/certs/private.key;

  proxy_set_header Host $host;
  proxy_set_header X-Forwarded-Proto https;

  location / {
    proxy_pass http://wp;
  }
}
This block includes:
- As above, the listening directives specify the port for which this server block will process requests. In this case we specify port 443, the default https port. The ssl and http2 parameters configure the port for ssl and HTTP/2 connections.
- The ssl_certificate and ssl_certificate_key directives specify the location of the self-signed certificate and private key within the nginx container. We’ve mounted our ./secrets/cert directory to this in our Compose file.
- The proxy_set_header X-Forwarded-Proto https; directive adds a header to the request to be passed to the WordPress service specifying that the client used the https protocol to connect to the service. Without this directive your webpage will be unformatted.
- The rest of the server block is the same as the one discussed in Part 3 – Adding a Web Server to Our Simple WordPress App.
You’ll note that we haven’t changed the nginx configuration for the Adminer service. As such communications with this service will still be with the unencrypted http protocol. To enable https communications at this point we’d need to create and install another self-signed certificate for the Adminer service. We’ll revisit this in Part 7.
Putting it All Together
Start with a copy of the project folder from Part 5. I’ve labeled my folder part-6. Next, create a self-signed certificate in a new /part-6/secrets/certs folder as shown above in Creating a Self-Signed Certificate with OpenSSL.
Our final Compose file is as follows:
Updated docker-compose.yml file for https communications
version: '3.7'

services:
  db:
    image: mariadb
    secrets:
      - mysql_root_password
      - mysql_database
      - mysql_user
      - mysql_password
    environment:
      MYSQL_ROOT_PASSWORD_FILE: /run/secrets/mysql_root_password
      MYSQL_DATABASE_FILE: /run/secrets/mysql_database
      MYSQL_USER_FILE: /run/secrets/mysql_user
      MYSQL_PASSWORD_FILE: /run/secrets/mysql_password
    volumes:
      - db:/var/lib/mysql

  wp:
    image: wordpress
    secrets:
      - mysql_database
      - mysql_user
      - mysql_password
    environment:
      WORDPRESS_DB_HOST: db
      WORDPRESS_DB_NAME_FILE: /run/secrets/mysql_database
      WORDPRESS_DB_USER_FILE: /run/secrets/mysql_user
      WORDPRESS_DB_PASSWORD_FILE: /run/secrets/mysql_password
    volumes:
      - wp:/var/www/html

  adminer:
    image: adminer

  nginx:
    image: nginx
    ports:
      - "80:80"
      - "443:443"
    volumes:
      - ./nginx:/etc/nginx/conf.d
      - ./secrets/certs:/etc/nginx/certs

volumes:
  db:
  wp:

secrets:
  mysql_root_password:
    file: ./secrets/mysql_root_password
  mysql_database:
    file: ./secrets/mysql_database
  mysql_user:
    file: ./secrets/mysql_user
  mysql_password:
    file: ./secrets/mysql_password
Our final nginx configuration file is as follows:
Updated nginx/nginx.conf file for https communications
server {
listen 80;
listen [::]:80;
proxy_set_header Host $host;
location / {
return 301 https://$host$request_uri;
}
location /adminer {
proxy_pass http://adminer:8080;
}
}
server {
listen 443 ssl http2;
listen [::]:443 ssl http2;
ssl_certificate /etc/nginx/certs/certificate.crt;
ssl_certificate_key /etc/nginx/certs/private.key;
proxy_set_header Host $host;
proxy_set_header X-Forwarded-Proto https;
location / {
proxy_pass http://wp;
}
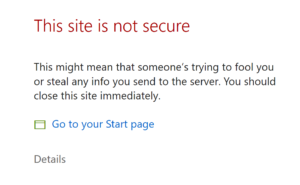
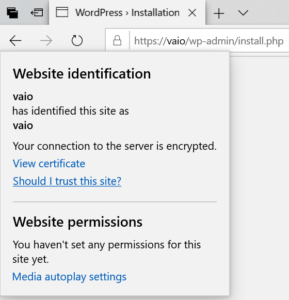
}You can now start up your WordPress app with docker-compose up -d and after waiting for the database to initialize visit the app in your browser with http://<host-ip> or http://<hostname>. Nginx will redirect your request to a https connection and because we haven’t installed our self-signed certificate yet, the browser should protest in some way. On Microsoft Edge, you should see something like the following (if you’re using the new Microsoft Edge you’ll see something like that noted for Google Chrome below).
On Google Chrome and the new Microsoft Edge, you should see something like the following.
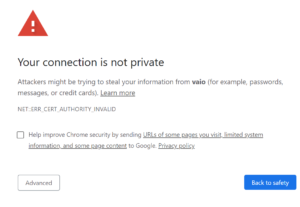
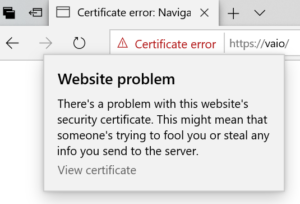
You’ll also notice a warning to the left of the address bar indicating Certificate Error in Microsoft Edge or Not secure in Google Chrome or the new Microsoft Edge.
At this point you could ignore the warning and proceed to your WordPress app since you know this is your own website on your local network. You’d do this by clicking on the Details link on the Microsoft Edge page or the Advanced button on the Google Chrome page and follow the links provided to proceed to your website. At this point your communications with the WordPress service would be over an encrypted connection so you could decide to precede no further. However, depending on your browser you may have to click through these warnings every time you visit your site, which would be a pain after a while. Google Chrome and the new Microsoft Edge pass you through but highlight in the address bar that the site is not secure. A better option is to install our self-signed certificate on our computer.
Installing Your Self-Signed Certificate
Installing your self-signed certificate is straight forward but the process will vary depending on your operating system. I’ll outline the process for Windows 10 and Microsoft Edge. Note that for some browsers, Google Chrome for example, the self-signed certificate we created above isn’t accepted. Our self-signed certificate doesn’t have a Subject Alterative Name section. Most browsers support this section but some browsers are now requiring that it be included. I’m not going to cover adding this to your self-signed certificate as our ultimate goal is creating our own certificate authority to sign our certificates. However, if you’re using one of these browsers you can create an appropriate self-signed certificate if you’d like by following the steps outlined in Creating a Self-Signed SAN Certificate (you can stop after you create the certificate with the openssl req command in Step Two).
The first step in installing your self-signed certificate is getting the certificate itself. Many browsers provide a simple way to download your certificate from your local server. Alternatively, you can simply copy the certificate from your local server and transfer it to you PC by some other means. I sometimes use WinSCP to do this, but a USB stick might be just as handy for a one-off transfer.
I’ll use Microsoft Edge to retrieve my certificate from my local server. To the left of the address bar, click on Certificate Error, then click on View Certificate.
You self-signed certificate will appear in a popup. In this window, click on the Export to file button to save your certificate to your PC remembering to note the name of the folder where you save it.
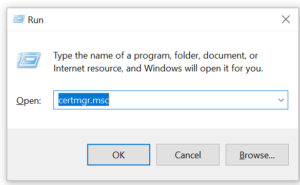
You now need to import this certificate into your trusted certificate store using the Windows certificate manager. There are several ways to open the certificate manager but I find the easiest for me is pressing Windows key – R to start the Run command box, typing in certmgr.msc and then clicking on OK to start the certificate manager (you can also access the Run command box by right clicking on the Start menu).
With the certificate manager running, import your self-signed certificate into the Trusted Root Certification Authorities store by right clicking on this item and selecting All Tasks and then Import.
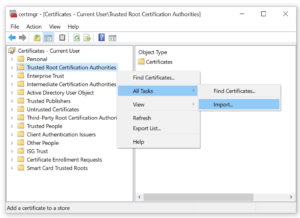
Follow the prompts, selecting the default selections. At one point you’ll be asked to browse to your certificate file. Select the file you saved above and then click through several more prompts/warnings. In the end the certificate manager will note that the certificate was imported successfully.
You can now navigate to your WordPress app as above and you should be taken directly to your site without any warnings. You should see a closed lock symbol to the left of the address bar indicating that the connection to the site is encrypted.
Note that you may have to restart your browser and/or clear its cache for the new certificate to take effect.
Remember that we still have to access Adminer over http protocol with http://<host-ip>/adminer or http://<hostname>/adminer. If you try to access Adminer over the https protocol with https://<host-ip>/adminer or https://<hostname>/adminer, you’ll be directed to you WordPress service. This is because your request is being handled by the default location / block in the https server which forwards it to the WordPress service. Well add a separate https server for Adminer in Part 7.
Wrapping Up
We’ve taken the first step in enabling secure communications with our WordPress app. Some of you may be satisfied with this self-signed certificate solution. It has its limitations though. You’ll need to install a separate self-signed certificate for each service. For example, you’ll notice that we still have to access the Adminer service over the unsecure http protocol. We’ll solve this problem in Part 7, starting with Part 7a – Creating your our own certificate authority.